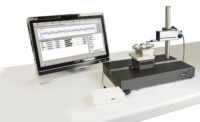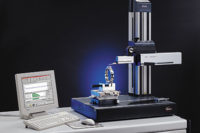
This measuring system combines roughness and contour measurements into a single, integrated system. Using a single drive unit and incorporating a laser interferometer within the gage to improve the range and accuracy of measurements, the system has a traversing length of up to 120 millimeters, and can measure both contour and roughness with a single stroke. Source: Mahr Federal Inc.
Most discussions on the quality of surface finish revolve around the measure of roughness. Indeed, roughness is the most common measure of surface finish, and parameters such as average roughness (Ra) and mean roughness depth (Rz) are the most commonly specified. But the ways to measure a surface and the reasons for doing so go far beyond roughness.
In fact, many experts choose to use the terminology of “surface texture” rather than simply calling these characteristics “roughness.”
Some measurements determine how a surface will bear loads, while others determine how well a surface provides a seal against leaks, either with gaskets or through direct contact. Some surfaces can be made to retain lubricant or adhere a coating. Others need to support the growth and attachment of human bone. All these parameters can be measured. As surfaces on manufactured artifacts are designed to provide specific functions, this functionality must be confirmed and controlled in the manufacturing processes used to create them.

Waviness parameters include a number of measures such as waviness average (Wa) and waviness height (Wt), which is the maximum peak-to-valley measurement of the waviness profile. Source: Mahr Federal Inc.
Common usage divides surface parameters into four basic categories: height parameters, spacing paramters, shape parameters and hybrid parameters.

When applying a coating to a surface, controlling the high-spot count in the process helps to ensure good finish aesthetics. Peak count (RPc) is defined as the number of roughness profile peaks per a unit length that rise above some predetermined line. Source: Mahr Federal Inc.
Height Parameters
Height parameters measure the surface deviations that are perpendicular to the surface. When used to look at short wavelength deviations associated with tool marks and machining processes, these are typically roughness parameters. Most height parameters are calculations of different peak and valley relationships present within a sampling length with respect to a mean line. Ra, for example, is simply defined as the arithmetic average of the height (or depth) of the roughness profile points.Rz, the other most commonly specified parameter, is sometimes defined differently by different standards, but is commonly called 10-point roughness, or the mean of five roughness depths of five successive sampling lengths.
When used to measure longer wavelengths, more widely spaced deviations generally associated with process conditions other than those directly contacting the part, height parameters can give an indication of the waviness of a surface.
The cause of these errors on a component could stem from worn bearings or spindles in a machine tool; incorrect adjustment of a machine; or even ambient vibration from the cutting tool, adjacent machines or some other source.

If a part needs to retain oil, a few deep valleys from an initial, rough process need to be left, in addition to the smooth surface achieved from the second smoothing process. The Rk family looks at the relationship between these two processes so both can be controlled effectively. Source: Mahr Federal Inc.
An example of the benefits of analyzing waviness involves an automotive manufacturer that was producing a shaft with bearing surfaces specified to an Ra of 10 microinches. Things were going fine for a year or so, until a few shafts started seizing up in the bearings. The manufacturer doubled-checked the problem shafts, and found the offending parts all had Ra values of around 8 to 10 microinches. Thinking that the Ra spec was even more critical than previously thought, the manufacturer changed the specification to 6 microinches Ra and added a costly superfinishing operation to ensure they could meet the spec.
But when prototype parts from this process were tested-all with an Ra of 3 to 4 microinches-almost every one of them seized. A more thorough analysis of the parts finally revealed a waviness problem caused by degrading shaft bearings in one of the machines. It was not a roughness issue at all, and all the time and money invested to make the parts smoother had only made them seize more quickly.

It is possible for two surfaces with the same Ra to have very different bearing area properties. Source: Mahr Federal Inc.
Spacing Parameters
Spacing parameters measure the distance between surface anomalies. These can be applied to some unit of length on either the roughness or waviness profile, but also can be defined over the entire length of a part. Peak count (RPc) is a good example. It is defined as the number of roughness profile peaks per a unit length that rise above some predetermined line. The standardized definition also quantifies how deep the valley between two peaks must be in order to be considered two separate peaks or simply two parts of the same peak. When applying a coating to a surface-as in a car body panel, for example-controlling the high-spot count in the process would help ensure good finish aesthetics.Another spacing parameter of interest is mean spacing (Sm), which defines the mean distance between high spots on the waviness profile. For example, if two surfaces need to be sealed with a gasket, longer spacing is better than shorter as the gasket will be more readily able to bend and conform. If the peaks are too close together, the gasket material will leave gaps.

The bearing area curve (BAC) and a number of other parameters seek to measure the capability of a surface to support a load. These parameters attempt to quantify the solidity of the bearing surface, that is to say, whether the area in contact between this surface and another will be primarily composed of solid material or just a few roughness peaks. Source: Mahr Federal Inc.
Shape Parameters
Shape parameters characterize more sophisticated aspects of surface functionality than the simple height or length measured by parameters from the first two categories. These are often results from multiple processes or the relationship between those processes, such as the ability of a surface to retain lubricant or to provide a more effective surface bearing area.A typical two-part machining process with a rough grind and then a finish grind can be used as an example. The rough grind leaves large deviations on the surface, and the finish grind skims off the top, leaving its own finer marks in place. If this part needs to retain oil, a few deep valleys from the first process need to be left, in addition to the smoothness achieved from the second process.
To do this, two aspects of the process must be controlled: the roughness of the final surface finish, and how deep into the valleys the finish grind or hone reaches. But in the typical manufacturing process, size control and roughness control are separate things. The operator at the finish grinder has a diameter gage and he is going to keep going until he gets the correct diameter. But if the incoming part size varies due to the rough grinding process, the operator’s finish grinding is going to affect the lubricity as well.
Sometimes the finishing process may remove too much or too little of the high peaks and deep valleys left from the roughing process. In short, trying to hit the right surface finish could mean one would get the wrong diameter, while trying to hit the diameter might mean getting the wrong surface.
Other shape parameters, such as the Rk family, look at the relationship between these two processes so operators can control both effectively.
The ability of a surface to provide a good bearing area is often of importance to its function. It is possible for two surfaces with the same Ra to have very different bearing area properties.
The bearing area curve (BAC) and a number of other parameters seek to measure the capability of a surface to support a load. These parameters attempt to quantify the solidity of the bearing surface, that is to say, whether the area in contact between this surface and another will be primarily composed of solid material or just a few roughness peaks.
Still other shape parameters seem to extend the realm of surface finish into the stratosphere of practicality.
Skewness (Rsk), for example, is a measure of the asymmetry of the amplitude density curve. But this also has its uses in that a negative skewness value indicates a surface with good bearing properties.
Kurtosis (Rku) also seeks to quantify bearing properties by measuring the peakedness of the amplitude density curve. However, both skewness and kurtosis can be influenced by isolated peaks and valleys, which often limit their usefulness.

This measurement system enables both roughness and contour measurements to be taken on the same unit without change of setup. Source: Mahr Federal Inc.
Hybrid Parameters
Hybrid parameters typically do just as the name suggests and combine concepts from height, spacing and shape parameters to perform such functions as the examination of height changes within a defined spacing or other more complex tasks.As an example, consider a ball rolling over a surface. If the surface is relatively smooth, the ball can roll quite quickly and always remain in contact with the surface. If however, there are peaks and valleys, there will be a limit to how fast the ball can roll without becoming airborne when traveling over roughness peaks that act like miniature ramps causing the ball to leave the surface and jump some distance. If a surface is intended to allow for good rolling contact this may be undesirable. However, even if the peaks and valleys are relatively large, as long as they are smooth the ball may not jump.
One useful hybrid parameter is Da, which measures the steepness of these peaks and valleys to provide a characterization of this effect.
The number of characteristics that can be measured on a surface is vast, as are the reasons why one would want to measure them. If one needs to control the stability of a manufacturing process, assess the functionality of a part or analyze some type of quality problem, reaching beyond roughness into the myriad of other surface texture parameters may provide the solution.


