Olympus Corporation announced the global launch of its IPLEX® GX/GT industrial videoscopes, new products in its scientific solutions business for manufacturing and maintenance inspection applications.
Phillips Precision’s Products Division announces its new 3-Legged Spider-Clamp™ as part of the Inspection Arsenal® LEAN, Quick-Swap inspection fixture system.
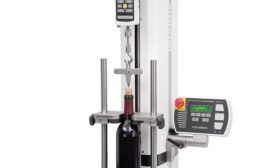
Mark-10 introduces their all-new G1105 Cork Extraction Fixture, designed for measuring the pull-out force of a cork stopper from a bottle. By measuring the extraction force, bottlers can ensure a satisfying customer experience, while maintaining the freshness of the contents.
You’ve made the threaded parts and are confident they are okay because you’ve checked them with your gages. Then you get the call from the customer advising you that their gages have rejected the parts and they are demanding re-work or replacements ASAP.
Much of society has been taught to believe that failure is negative and results in the loss of much effort and resources. This is only true if we allow this thinking to become reality.
Reverse engineering and quality control will continue to be growing applications for 3D scanning technology, along with newer opportunities in virtual and augmented reality.
What do Arnold Schwarzenegger, a Tyrannosaurus Rex named Trix, British water pipes, and a 1927 Ford Eifel have in common? They have all been digitized using professional handheld 3D scanners.
With the resurgence of manufacturing in the United States has come a high demand for flexible quality inspection systems in the production environment.
Origin Technologies Corporation’s automated, EOAT, non-contact blue laser measuring system for gap/flush on a moving assembly line that can work consistently, on various types of body panels and independent of vehicle models to improve build quality.
The fundamental requirement of any probing cycle on a machine tool is acceptable and reliable metrology. In addition to this, the metrology must be achieved in an acceptable time.
CMMs are vital measurement systems for many quality departments. Of the many active components of these systems, the software used to control and record the measurement of parts is critical to getting the most complete performance out of your machine. It is important to be diligent in your search for the software package that will best fit your needs.