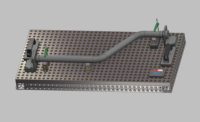
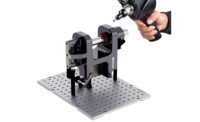
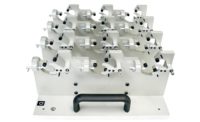
Proper fixturing addresses several key parts of quality: It ensures that inspected parts remain in a repeatable and reproducible orientation on a measuring device. It keeps parts from moving during the inspection process. And it minimizes operator error during the inspection process.
Whether used for custom or modular metrology, fixturing provides several advantages, says Doug Emory, regional sales manager, Renishaw.
“The primary benefit is maximizing efficiency in the measurement operation by reducing part loading and unloading time,” Emory says. “Bringing consistency to the measuring operation allows part programs to run smoothly without error and brings repeatable results.”
In other words, he says, proper fixturing saves time and money.
Too many inspectors are expected to use machines that cost $150k-$250k or more — “which are only great when you can turn them on,” says Allan DeLisle, technical sales coordinator, Phillips Precision.
“If you are spending an hour trying to inspect with silly putty or build a fixture with machining vises and nuts and bolts, that’s all time that the machine is not running.”
But working with an easy to use, versatile modular fixturing system enables operators to easily build fixtures and quickly get the machine up and running.
“Plus, you can build the fixture for the next part on a separate table, while the machine is running, so there is no downtime between parts,” DeLisle says. He recommends manufacturers design the inspection fixture at the same time they design the part and machining fixture. They can then have the fixture ready when the part comes off the shop floor, which will keep inspection at the forefront.
In recent years, inspection has changed dramatically, experts say. Tolerances are tighter, parts are more complex and the shop floor has the ability to crank parts out faster than ever before.
“The technical skills of a good metrologist surpasses just math skills, but also computer and programming skills are at the top of the list,” DeLisle says.
Over the years, new technology just keeps getting better with more components in the modular systems, says Linda Goodwin-Marino, president and co-founder, Paul Marino Gages.
“Whether it’s plastics, aluminum, steel or composite parts, there is a system out there. Modular tooling is still evolving.”
Manufacturing capabilities and materials have evolved to improve metrology fixturing, Emory says. Many new products have been introduced for specific applications.
The trend toward hybrid fixturing solutions, a cross between modular and permanent fixturing, seems to be growing, Emory says. Such solutions are characterized by a combination of products that allows flexibility for fixture setups along with quick setup times.
“Manufacturers today are very focused on the cost factor and time is money,” Goodwin-Marino says. “If an inside team or department can provide a last-minute fixture to the inspection department, it’s a win-win situation. Investment in a selection of components and kits will be a wise decision with a spread over time with multiple uses and ROI as a corporate asset.”
Small fixture providers may be required to provide fixturing, often dedicated, for that production part for preliminary inspection or “buy off,” Goodwin-Marino says.
“Often, the end-customer doesn’t want to perform receiving inspection and house the fixture so they may require it but may not pay for it,” she explains. The part production responsibility often falls on the outsourcing part manufacturer.
“This cost is added into the project but the manufacturer making the parts can utilize the modular system for multiple projects and spread the cost over multiple customers,” Goodwin-Marino says. “Again, more win-win for the part maker.”
The technology does come with its share of challenges. Rapidly changing part design and increased product quality specifications present challenges to establishing the permanent solutions desired for part measuring applications, Emory says.
“The major challenge is getting training,” DeLisle says. “Every OEM has a different software, which work far differently. So, if you aren’t using it every day, it’s easy to forget how to use. Especially if you have multiple different machines all with different software.”
Fortunately, there are some new third-party software brands that can talk to different machines of all brands, he says.
But there are very limited resources available to train inspectors.
“Many times, the education needed to be a great inspector will also launch the operator into a high level corporate “lab coat” type position, which, unfortunately, leaves manufacturers with limited staff to inspect on the ground floor,” DeLisle explains.
So how does one choose the right fixturing solution?
First, look at your measurement machine and assess your part volume.
Low volume parts and prototypes lend themselves well to modular fixturing that can be torn down and re-used in other applications, while high volume and production parts often lend themselves to custom fixture solutions with dedicated part nesting stations and sometimes multiple part nesting stations, Emory says.
“Sometimes a hybrid method is used where modular fixturing is assembled and kept intact on a fixture plate for repeated use with a high-volume part,” he explains. “We also look at the complexity of a part to determine structurally what is needed to support the part during the measurement operation.”
Access to the part when using touch probes for CMM or articulating arm applications is also critical, Emory says.
When looking at measuring specific parts, manufacturers must ensure that the fixture can hold the part in the orientation needed for the touch probe or vision system to access the critical features, DeLisle says.
“The fixture needs to hold the part firmly enough so that it does not move in the fixture, but not so tightly that it deforms the part,” he says. “You don’t want to be making a good part bad on the machine because your fixturing was bogus.”
Additionally, the fixture should be easy to successfully load and unload repeatedly by someone who has no idea what they are doing, he says. And with modular fixturing, fixtures can be kept dedicated to a part, or can be disassembled and used for something else.
“Typically, the overall size and weight of the part(s) or full assembly, is the driver on traditional weldment fixturing methods and the specific work holding need,” Goodwin-Marino says. A test fixture is primarily for work holding, while a checking fixture will have specific attributes to measure and compare to data files with locations to be measured for review.
“This application is very receptive to the modular fixturing methods using kit systems with a myriad of locating, holding, and clamping components,” she explains. “The larger, heavier fixtures used in the production environment will present a more robust usage with durable, longer lifespan for the duration of the part run, such as with sheet metal stampings.”
In a stamping operation, sample testing usually occurs in production areas versus in on-site inspection labs that will, in a controlled environment, randomly check for specifics such as die wear and part imperfections. “This alerts the various teams that something needs to be reviewed so, if urgent, stop the presses!” she adds.
Ultimately, the prevailing mindset about inspection in general is due for a refresh, says DeLisle.
“For far too long it was considered a necessary evil — a non-value-added process,” he says. “It is actually where the value of your work actually stems from. Inspection data is critical to delivering perfect parts faster.”


