Quality Measurement: Styli Increase CMM Measurement Efficiency
Coordinate measuring machines (CMMs) are widely used throughout manufacturing industries, such as aerospace and automotive, to meet the increasing need for high quality standards and dimensional accuracy. However, in many applications, CMM measurement is not as efficient as it could be, so new technology and techniques have been developed that can improve flexibility, reduce inspection time and achieve consistency. Repeatable stylus changing systems, available for both manual and automatic CMMs, help achieve measurement efficiency.
The range of features and components that must be measured in a typical factory means that manufacturers need a flexible measuring solution, keeping in mind that the feature to be inspected dictates the type and size of stylus to be used.
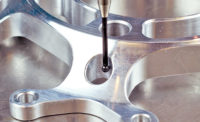
In contact measurement, CMM data collection starts at the stylus tip, the part of the measuring system that makes contact with the workpiece. Most CMM users have a single sensor and stylus configuration, and although they might not realize it, in most cases this is limiting. Unless measuring a simple component, the stylus configuration needs to be changed to suit different measurement tasks. Traditionally this has been done manually, using a threaded connection. However, probe systems are now available with a repeatable stylus interchange, greatly increasing system flexibility by allowing quick changes to long or complex styli configurations, as well as different tips-for example, sphere, disc or cylinder-needed for different feature types. Such changes also can be carried out during measurement cycles.

Stylus choice
Choosing the right stylus for the feature is crucial to measurement performance. Successful gaging depends on the ability of the stylus to access a feature and then maintain accuracy at the point of contact. In all cases, maximum rigidity of the stem and perfect sphericity of the tip are vital, so it is important to:
• Keep styli short. The more that a stylus bends or deflects, the lower the accuracy. Probing with the minimum stylus length for an application is the best option.
• Minimize joints. Every time styli and extensions are joined together, potential bending and deflection points are introduced. Wherever possible, use the minimum number of pieces for an application.
• Keep the ball as large as possible. It maximizes the ball/stem clearance, thereby reducing the chances for false triggers caused by ‘shanking out' on the stylus stem. It also reduces the effect of the surface finish of the component.
With these points in mind, it becomes clear that a variety of styli are necessary for different features on a part. For example, a longer stylus may be required for a deep hole, a small ball for a small diameter hole, and a large ball for ball/stem clearance or to cope with certain surface finishes.

Throughput and flexibility
An ideal sensing system needs to deliver the benefits of speed, accuracy and robustness, while providing the best probe and stylus configuration for each measurement. Additionally, it must be flexible and easily upgraded to meet the growing demands of off-line inspection.
A common source of error on non-modular touch-trigger probes occurs when using long styli that require a manual adjustment of the probe's triggering force to compensate for the influence of the stylus. Often the trigger force is not adjusted, or without a visual indication of change, would not be reduced when a shorter stylus is re-mounted.
Automated stylus changing reduces operator intervention and increases measurement throughput.

Flexibility with probe changing
Many CMM users find that they need the flexibility of sensor changing, for example, switching to ultra-high accuracy strain-gage probes, or to noncontact laser probes. This can be achieved with heads and probes using auto-joints, which have recently been adopted by the Optical Sensors Interface Standards Committee as the industry standard coupling for probe changing. The sensors can be changed in-cycle and stored using auto-change rack systems, all on the machine.

Stylus changing systems in use
Martin-Baker Aircraft Co. Ltd. (Middlesex, England), manufacturer of aircraft ejection seats, produces high-quality complex components for its seats, all featuring a number of critical dimensions for reliable operation. Rigorous inspection on every component must be consistent and comprehensive, but not such that it becomes a bottleneck and holds up the entire manufacturing process.
Jim Kelly, inspection cell leader, says, "In 1998, we wanted to upgrade our inspection as at that time a typical part took a whole working day to check completely. Now it takes about two hours, half an hour of which is the dimensional check on the CMMs." The four automated CMMs purchased in 1998 have been fitted with stylus-changing systems and stylus racks. Pre-programmed and carefully controlled routines are employed, specific to each part and variant of each part. The multiple stylus arrangements, which have been selected to be common to all jobs, allow every machine to access all the features on all of the different parts and achieve total flexibility. The stylus calibration is done in a single complete routine, run overnight.
The other significant advantage, and change to working practices, is that machine-tool operators go to the inspection department, and by following simple instructions, run the routines themselves, allowing the machine to fully inspect the component automatically.
Kelly says, "It has a made a big difference to inspection. Machine operators do it all themselves. They take responsibility not just for the manufacturing of the part, but also for its quality. We couldn't live without the stylus changing systems." Q
TECH tIPS
• The feature to be inspected dictates the type and size of stylus
to be used.
• Unless measuring a simple component, the stylus configuration needs to be changed to suit different measurement tasks.
u Successful gaging depends on the ability of the stylus to access a feature and then maintain accuracy at the point of contact.
• Automated stylus changing reduces operator intervention and increases measurement throughput.
Looking for a reprint of this article?
From high-res PDFs to custom plaques, order your copy today!


