Automated Gaging Slashes Cycle Time
The transmission gear bore grinding and measuring area is a case in point. When Harley-Davidson launched a flexible, cellular manufacturing system in the early 1990s, the company initially configured this department into two cells -- each including a CNC cylindrical grinder, an automatic gaging system and a robot. But as demand increased, "it was approaching the point when the daily volumes would be greater than what we could produce in 24 hours," notes John Johnson, Harley-Davidson manufacturing engineer.
In response, the company decided to move gear production for the company's Big Twin (FL) motorcycle to a different facility, while maintaining gear production for the lower volume Sportster (XL) model in the initial grinding area. The lower XL product volumes would require only one cell, but to meet the demand, the grinding time and changeover times between gears would have to be significantly lower than those in the original two cells.
Harley-Davidson worked with three different suppliers to develop cell specifications to meet capacity demands. After reviewing the proposals, Johnson and his team decided on a cell design that includes an ABB IRB3000 robot, a Tripet TST 250 CNC twin spindle bore grinder supplied by Usach Technologies Inc. (Elgin, IL) and a closed-loop feedback measuring system supplied by Edmunds Gages (Farmington, CT).
When the cell is in operation, the robot first loads a part into the grinder. It grinds two bores sequentially, each with a separate offset, with the inside diameter wheel spindle. Then the second spindle, an outside diameter (OD) wheel, vectors in to grind a face and create a contoured diameter.
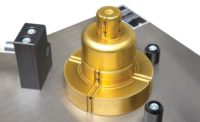
Once the grinding is complete, the robot unloads the part from the grinder and places it in the correct gaging fixture. The custom gage is configured with two gaging stations; one for a flat gear family and one for a shaft gear family. Once the part is in the fixture, two bores are air gaged for bore size, calculated roundness, and taper. The ground OD and face height are also measured simultaneously with linear variable differential transformers. Both bores have a tolerance of I0.0005 inch, the OD I0.0004 inch, and the height I0.005 inch. The gage's computer control, Edmunds' CAGQCM, gathers the measurement data. If it detects that any of the four measurements are edging beyond the preset control limits, it sends the offset information to the grinder's controller, and the size is adjusted on the next part.
Compared to the previous cells, which required 18 minutes to perform a part changeover, the new cell requires only two minutes. "We cut changeover time dramatically," says Johnson. "And it's the automatic gage that has made a majority of the difference." he notes. The previous cells required manual tooling changes. But with the new cells, "there's no tooling to change whenever we switch between the different parts. It's all software driven," Johnson relates.
Grinding cycle times were also significantly reduced. Among other factors, the second spindle on the Tripet grinder allows bore and OD operations to be performed in one chucking instead of two. In all, grinding cycle times were reduced from five minutes in the old cells to 80 seconds in the new cell.
"We want the assurance of 100% inspection on transmission gears," Johnson explains. "Harley-Davidson won't accept noisy gears interfering with its unmistakable sound. And the entire cell, including the measuring system has to be automatic. To have the operators do it would be a waste of valuable time used for other tasks in the same area. Closed-loop feedback gaging technology is the only way to go."
Edmunds Gages
(860) 677-2813 Reply 10
www.edmundsgages.com
Usach Technologies Inc.
(847) 888-0148 Reply 11
www.usach.com
BENEFITS
- Part changeover times were reduced from 18 minutes to two minutes, while grinding cycle times dropped to 80 seconds from five minutes.
- Automatic closed-loop feedback gaging technology frees up operators for other tasks.
- When the gaging controller detects that measurements are edging beyond preset control limits, it notifies the grinder's controller, and the size is adjusted on the next part.
Looking for a reprint of this article?
From high-res PDFs to custom plaques, order your copy today!


