Quality 101: Leak Testing: Calibration Matters
Avoid these common mistakes when it comes to leak testing and calibration.

Ensuring accuracy of leak test methods sometimes requires extra steps.
Even if tolerances for leak testing do not require such extra steps, there is always potential for inaccuracy if calibrations are ignored or approached incorrectly. There are several common mistakes that can be made when it comes to leak testing and calibrations.
First, some make the mistake of confusing gage repeatability and reproducibility (R&R) with evidence of measurement accuracy. A leak test process can be repeatable and reproducible yet produce inaccurate results. The tolerances that an application requires can contribute to how mistaken the equation of gage R&R with measurement accuracy can be.
For example, if the real leak rates are 5 standard cubic centimeters (sccm), but false readings of 3 sccm are given, then any variation will be similarly reduced. It is in this way that gage R&R and measurement accuracy are related. Calibration of the leak test process is needed, even if gage R&R is within tolerances.
Secondly, many are still using obsolete calibration methods that are prone to error. For example, if measuring low leak rates below 2 sccm, sometimes, but not always, the best methods are fully electronic solid state calibration tools. What many do not realize is that fixed orifice calibration tools will only give reliable readings at the specific point where it is calibrated.
A more accurate approach to calibration is to use calibration tools that are adjustable and accurate at all points and all pressures. Soap film flowmeters or rotameters with fixed orifice designs are obsolete technology.
Calibration instruments are now readily available that display leak or flow rates continuously in digital read-out formats that do not require operator judgment or calculations. These types of instruments do not have a single fixed orifice, but rather adjust transducer readouts to the pressures and orifice sizes used for the specific applications.
Third, calibration tools used must be re-calibrated according to schedule. Reputable manufacturers of calibration technology will define this re-calibration schedule at the time of purchase.
Fourth, calibrations need to be done in simulations of real production processes that hew closely to real-world production methods.
For example, if an automatic machine is used for leak testing, ensure that the calibration occurs in a comparably automated fashion and that the master part is the exact equivalent, or as close as possible, of what is actually being produced.
Lastly, do not underestimate the potential for the master parts used for calibrations to deteriorate. Leak testing is usually done at higher than normal operation pressure and this takes its toll on the life of the part. This is particularly the case with any parts that have flex, as they are more likely to wear out during normal operating procedures.

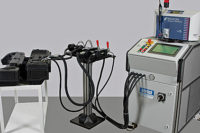
A high-speed assembly and test system incorporates automated instrument calibration and calibration verification permitting untended 24/7 operation. Source: InterTech Development Co.
Ensuring accuracy of leak test methods sometimes requires extra steps.
Even if tolerances for leak testing do not require such extra steps, there is always potential for inaccuracy if calibrations are ignored or approached incorrectly. There are several common mistakes that can be made when it comes to leak testing and calibrations.
First, some make the mistake of confusing gage repeatability and reproducibility (R&R) with evidence of measurement accuracy. A leak test process can be repeatable and reproducible yet produce inaccurate results. The tolerances that an application requires can contribute to how mistaken the equation of gage R&R with measurement accuracy can be.
For example, if the real leak rates are 5 standard cubic centimeters (sccm), but false readings of 3 sccm are given, then any variation will be similarly reduced. It is in this way that gage R&R and measurement accuracy are related. Calibration of the leak test process is needed, even if gage R&R is within tolerances.
Secondly, many are still using obsolete calibration methods that are prone to error. For example, if measuring low leak rates below 2 sccm, sometimes, but not always, the best methods are fully electronic solid state calibration tools. What many do not realize is that fixed orifice calibration tools will only give reliable readings at the specific point where it is calibrated.
A more accurate approach to calibration is to use calibration tools that are adjustable and accurate at all points and all pressures. Soap film flowmeters or rotameters with fixed orifice designs are obsolete technology.
Calibration instruments are now readily available that display leak or flow rates continuously in digital read-out formats that do not require operator judgment or calculations. These types of instruments do not have a single fixed orifice, but rather adjust transducer readouts to the pressures and orifice sizes used for the specific applications.
Third, calibration tools used must be re-calibrated according to schedule. Reputable manufacturers of calibration technology will define this re-calibration schedule at the time of purchase.
Fourth, calibrations need to be done in simulations of real production processes that hew closely to real-world production methods.
For example, if an automatic machine is used for leak testing, ensure that the calibration occurs in a comparably automated fashion and that the master part is the exact equivalent, or as close as possible, of what is actually being produced.
Lastly, do not underestimate the potential for the master parts used for calibrations to deteriorate. Leak testing is usually done at higher than normal operation pressure and this takes its toll on the life of the part. This is particularly the case with any parts that have flex, as they are more likely to wear out during normal operating procedures.
Looking for a reprint of this article?
From high-res PDFs to custom plaques, order your copy today!


