Reintroducing Machine Vision

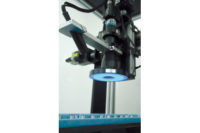
A smart camera is integrated with machine tooling to measure leg geometry of surface mount electronic components. Source: Aptúra Machine Vision Solutions
Over the years, machine vision has become an important tool for quality analysis. As a technology, it is well-suited for on-line improvement of the manufacturing process. Yet machine vision is not as ubiquitous on the plant floor as might be imagined. According to some market experts, operators barely have scratched the surface with respect to opportunities for machine vision inspection in the manufacturing process. Perhaps it is time to reintroduce machine vision to the quality professional, discuss where the technology is today and review how machine vision can be used successfully.
Machine vision is an automated technology in which images are captured and transferred to a computer-image acquisition-and then processed to perform an inspection task and report the results-image analysis. Although sometimes implemented off-line, it is most effective when used as an integral part of a manufacturing process to capture production errors. Machine vision inspection can enhance quality when used to evaluate manufacturing at various steps in a process, thereby providing immediate and targeted feedback that often includes information about how to improve the process.
Overall, machine vision technology is continually changing, growing and improving. Processing power has increased significantly in just the past few years, and higher resolution imagers are more readily available. At the same time, component costs continue in many cases to decline, making machine vision a cost-effective technology for the plant floor. According to the Automated Imaging Association, the machine vision industry will experience significant growth through 2010, with some industry sectors posting double-digit annual percentage increases in the number of units sold.
There are more suppliers providing a growing variety of components and systems in the machine vision marketplace. The offerings include products for lighting, camera lenses, digital and analog cameras, smart cameras, smart sensors, and PC-based software and libraries. These are considered general-purpose components in that they may be successfully applied to a wide variety of applications, and with the exception of certain niche applications, systems based on these general-purpose components dominate the market.
With more than 30 suppliers competing in the smart camera/smart sensor market alone, component selection for general purpose applications can be challenging. With respect to smart cameras and sensors, these products are generally grouped by performance and algorithmic capabilities. Different components compete for low-end applications and others target higher-end, more challenging applications.
Within each of these groups, the products can be differentiated by, for example, the method of configuration or programming, or by other features such as algorithm capabilities, communications capabilities or type of operator interface. Other components, such as lighting and optics, are more application specific and must be chosen based on the imaging requirements of a particular part or feature to be inspected.
Application-specific systems also are available. These systems have been designed to perform a certain inspection that is narrowly defined for a particular part, process or industry. A few examples include systems to inspect glass, printed circuit boards, semiconductor wafers, pharmaceutical products, or aluminum or steel cans. These systems typically perform well within the scope of their intended use and might be considered for those targeted applications where an application-specific solution exists.
Applications for which machine vision is commonly used may be grouped into the following categories: assembly verification, object recognition, flaw detection, gaging, guidance, and optical character recognition and optical character verification (OCR/OCV) or other code reading. Different algorithms for image analysis and processing are available for application with these tasks. Most general-purpose machine vision component and software manufacturers provide a selection of algorithms targeted for these applications. Overall, these manufacturer-supplied algorithms are well-implemented and reliable.

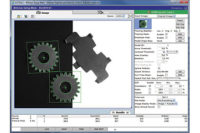
The inspection system can sort printed labels prior to automated packaging. Source: Aptúra Machine Vision Solutions
The Basics
A common machine vision misconception is that the system “takes a picture” of a good part, then compares subsequent parts to that picture. Perhaps in a broad, holistic sense the process can be described in this way. Certain specific algorithms and at least one machine vision component actually do these direct image comparisons, but for most inspections, image features are processed discretely. The image is usually sub-divided into regions of interest (ROIs), and within those ROIs, object information is extracted and features are evaluated as to size, color, shape and other qualities using a variety of algorithms or tools. From this information, the system makes quality decisions regarding the areas and features being inspected.Imaging is the most critical part of any machine vision application. Correct lighting and optics can contribute more than 80% to the success of a project. LEDs are the most commonly used light source and can be found in a configuration that suits most applications. Ambient, plant floor lighting is never appropriate for machine vision. High-quality lenses specifically targeted for machine-vision applications are available and should always be used because of their improved contrast and resolution. Lens selection is based on the desired field of view, the working distance available from the part to the lens and the size of the image sensor in the camera.
Certain physical constraints limit the performance of any machine vision system. Potential operators perpetually ask whether machine vision processor ‘A’ or smart camera ‘B’ can perform specific applications. The truth is that the application rarely is limited by the brand of the smart camera used. The critical consideration in all applications is the image, and by association, the lighting and optics used to create the image, and the physical size of the image relative to the size of the camera sensor.
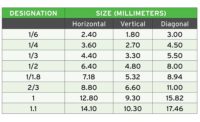
By understanding the fundamental imaging limitations, operators can better specify the correct system architecture for any application. A single pixel represents the smallest image unit that can be processed. For any given camera, the pixel resolution is the size of the real-world field of view divided by the number of pixels in the same direction. For example, if an image is to view a 6-inch horizontal area, and the camera sensor is 640 pixels, a single pixel will cover 0.009375 inch. This is a physical constraint for this image no matter which brand of camera is being used. By extending this physical limitation to the image analysis tasks, operators arrive at some estimates for system performance that will again be component-independent. Depending on image contrast, in many cases an object must cover a minimum pixel space of 2 to 3 horizontally and vertically, or an area of 4 to 9 pixels, for an assembly verification or flaw detection application. For object recognition the area covered by the object may need to be even larger. Given the example, the imaging system described only will be able to detect or evaluate objects larger than about 0.01875 inch.
For gaging or location applications, consider what tolerances must be achieved. Specifications for gaging equipment varies, but one common specification is that a gaging instrument must have a minimum resolution of 1/10 of the tolerance band. An important feature of dimensional gaging or location algorithms in machine vision is the ability to detect locations or make measurements to sub-pixel accuracy. A realistic estimate of real-world sub-pixel repeatability is 1/10 of a pixel. For the image described above then, the minimum gaging resolution would be 0.0009375 inch, and the system may be able to be a reliable and repeatable gage for a measurement tolerance of ±0.0047 inch. Note that when evaluating the gaging capabilities of any machine vision system, these calculations are estimates only. The only way to know the true system capabilities will be through testing in the production environment.

The machine vision system works for gaging and quality analysis of foam cores used in automotive engine casting. Source: Aptúra Machine Vision Solutions
Analysis and Specification
The keys to any successful machine vision project are the definition and communication of specific application requirements. Planning, whether formally or informally, is critical when approaching the use of machine vision technology. With declining pricing points, the cost of acquiring some form of machine vision hardware is within the reach of many budgets. However, the successful implementation of an application requires significantly more up-front consideration, and typically much more cost, both in terms of support hardware and in engineering resources.As the first step in the definition of application requirements, a company’s project planning should take into account corporate issues and philosophies related to the manufacturing process. One must know quality policy, and the practical issues of cost analysis and justification of capital expenditures. At this point in the process a multi-disciplinary team should be developed to proceed with application evaluation and the development of a specification. This team must have a champion who is committed to dedicating the personal energy to the project required for its success. The team and the project must also have management support.
In evaluating the application, the existing process must be examined and expected results quantified. The parts to be inspected must be analyzed for part-to-part variations, and the process for process variations. Specific automation constraints must be identified such as cycle times, available physical space, reject processing and communications. Process issues like input/output (I/O) handshaking, operator interface design, data capture and reporting also must be considered. The team also should identify the issues that affect the return on investment period or other realized savings from the equipment after installation.
The outcome of all of the planning and evaluation is a final specification. The purpose of this document is to clearly define the expected inspection task, and the required performance of the inspection system. It is the standard by which the machine vision system is to be judged. The system must perform to all of the stated specifications, and conversely is not required to do more than what is specified. The specification should discuss project scope, the part description and specification, and acceptance criteria in detail.
Implementation of the machine vision system may be undertaken by in-house engineering resources, but quite often is outsourced to an integrator or machine builder with experience in the technology. Develop appropriate criteria for selecting partners for the machine vision project. One determining factor may be whether the systems provider is willing to fully guarantee the system performance.
Become acquainted with the technology and follow appropriate system planning steps, and machine vision can be an indispensable tool for quality in manufacturing.
sidebar: tech tips
- Machine vision is an automated technology in which images are captured and transferred to a computer, and then processed to perform an inspection task and report the results.
- Although sometimes implemented off-line, machine vision is most effective when used as an integral part of a manufacturing process to capture production errors.
- Machine vision inspection can enhance quality when used to evaluate manufacturing at various steps in a process.
Looking for a reprint of this article?
From high-res PDFs to custom plaques, order your copy today!


