There is a growing awareness that subtle changes at the surface of a component can have a significant effect on its service life, particularly if that life is limited by the risk of a fatigue fracture. Fatigue cracks most commonly initiate at the surface so the integrity of the manufactured surface is particularly important.
In today’s economic environment, there is the opportunity to refine manufacturing processes, improve tooling and methods, and reduce cycle times to minimize future manufacturing costs. These same process changes also have the potential to alter surfaces in ways that are not addressed in routine inspections. To analytically evaluate the effects of process changes be aware of the events taking place during the creation of the surface and the differences introduced with changes to the process.
The events taking place at the cutting edge of a machine tool are enormously complex, and while the mathematical models of manufacturing processes are improving, a practical approach is still essential in the assessment of surfaces. Let’s look at one of the characteristics of manufactured surfaces that can provide data essential in both quality control (QC) and quality assurance (QA) environments.
X-ray diffraction can be used to characterize the residual stresses in surfaces created by machining or modified by shot peening and other processes, and contributes to understanding how surfaces and properties are affected by process changes. X-ray diffraction is a well-established tool for residual stress measurement in process approvals and in subsequent process control.
Methods are described in the Society of Automotive Engineers’ (SAE) publication HS-784, and the measurement process itself has ASTM standard 915 to ensure that instruments are aligned and are capable of measuring stresses in most materials to within ±2 kilo pounds per square inch and in more difficult materials to within ±5 kilo pounds per square inch through the full range of stress from compressive to tensile yield.
In addition, X-ray diffraction can measure the degree of plastic deformation experienced in a thin layer at the surface of a part and can detect the presence and extent of phase transformations in the near-surface crystal structure, triggered by the manufacturing process.
Residual Stresses
When the surface of an object is modified, for example by machining off a layer, by locally modifying its composition or by covering the surface with a pattern of overlapping mechanical dents, the crystal structure in the material near the new surface becomes distorted, both elastically and plastically.Elastic deformation of material is accompanied, as one may expect, by a reversible change in the distance between the planes of atoms in the crystal structure of the material. Plastic deformation of the material introduces permanent damage and distortion of the crystal structure.
Local plastic deformation of a material also leaves behind a residual stress pattern. For example, bending a strip of metal until the inner and outer surfaces pass the yield point, and then allowing it to spring back leaves the strip bent with the outer surface in residual compression and the inner surface in residual tension. Any local plastic deformation will have an effect like this-when the external source of local plastic deformation is removed, the part is left with a residual stress pattern.
In conventional machining of metals, the tool is heated near the cutting edge by friction with the workpiece and the chip. At the same time, the material of the workpiece near and ahead of the advancing tool is being deformed by the tool and also is being heated by friction with the tool and by conduction from the tool. The heat causes expansion, which can be enough to yield the material in compression, restrained by the surrounding material.
The extent of these effects is dependent on cutting conditions such as speed, feed and depth of cut, and less manageable parameters such as the type and amount of cutting lubricant and coolant, the tool design and the presence (or absence) of wear at the cutting edge, and even the rigidity with which the tool’s position and orientation is maintained under the forces generated by cutting. When thermal equilibrium is restored, the surface is left with a residual stress gradient, characteristic of the thermal and mechanical events that created the surface.
Shot peening offers a method to give a surface a controlled compressively stressed layer, which inhibits fatigue crack initiation and extends the life of the part. Residual stress profiles are measured to compare processes intended to give similar results and to monitor the stability of a defined process over time.

X-ray Diffraction
When a beam of X-rays is directed at a crystalline material, a portion of the beam appears to be reflected in specific directions. The process is described by Bragg’s Law. Bragg’s Law was first expressed almost 100 years ago and since then X-ray diffraction has been developed and used in a wide variety of fields, including the determination of molecular structures of complex organic molecules such as proteins, the automated determination of single crystal orientation in the manufacture of some gas turbine components and the measurement of residual stress.
Practical Methods
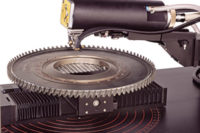
The many and varied applications of X-ray diffraction have resulted in the development of instruments that are refined to optimize performance in their particular specialization. To measure residual stress requires very precise measurement of the change in lattice plane spacing as the angular relationship between the incident beam and the specimen is changed. The result is an instrument that operates at high values of diffraction angle and measures the changes in the diffraction angle of a single set of crystal planes as the incoming beam is tilted.Values of d-spacing are used to calculate the strain in a specimen instrumented with calibrated strain gages, from which an elastic constant specific to the X-ray method for the material under test is calculated. X-ray machines designed for this purpose are compact, rugged and portable, and perform as well on a factory floor as they do in a laboratory.
The contribution of computer systems to the control of modern X-ray goniometers to data acquisition and to interpretation of the raw measurements has been remarkable. It is now possible to make a complete stress measurement in a few minutes, where the same measurement used to require several hours in data collection alone.
Comparisons between sets of data are easy to present and interpret, and raw data collected in the past can easily be imported and re-interpreted using current methods.
Perhaps most important, current machines can make multiple measurements of stress at a single location and statistically demonstrate the reproducibility and reliability of their data. Coupled with the automation of stage movement, modern residual stress measuring systems can be preprogrammed to collect data unattended from complex components, making them highly productive instruments. Specialization of the instruments continues with the development of models capable of working inside machined holes and deep inside tubes and pipes, where residual stresses around welded joints have caused concern.
The range of applications of residual stress measurement by X-ray diffraction continues to grow, particularly in areas of public health and safety. Aging bridges, required to carry ever increasing traffic loads are a subject of concern, and components of aircraft and their engines can be subjected to these measurements at overhaul to assure engineers of their fitness for ongoing service. Medical implants such as artificial joints are subjected to a very corrosive environment when they are in service.
Surface treatments such as shot peening have been used to minimize stress-corrosion of these devices by installing compressive residual stresses, and the quality of their surfaces was assessed by X-ray diffraction. NDT


