Other Dimensions
Pursuing Pitch Diameter
Learn More About Thread Metrology.


Most threaded products such as fasteners are verified using fixed limit gages when their ability to assemble with mating parts is of primary concern. However, disputes may arise that require direct measurement of the threads. Other applications may require such measurements as part of basic quality requirements, for statistical process control, or machine setup. When “go/no-go” answers are not enough, the pitch diameter of the thread is usually the first—and most critical—element of the thread that is measured.
Two problems can be encountered when disputes are the reason for the measurements. The first is that fixed limit gages engage (or not) most elements that make up the thread while pitch diameter is only one of those elements. The second problem is that there are several instruments used to measure pitch diameter but they are different in how they do the job.
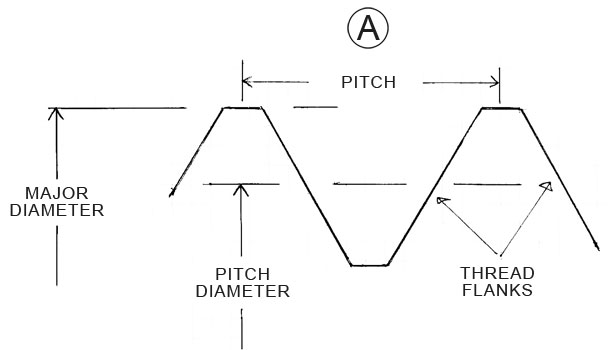
Pitch diameter is an imaginary cylinder often referred to as “simple” PD or groove diameter because it is considered an isolated element of the thread diameter. The problem in measuring it is due to there not being a distinct surface you can take a measurement from like the major diameter. The sloping flanks or sides of the thread form mean something is required for contact at the pitch line to provide an accessible surface for measurement. The tool used for this purpose is the thread measuring wire.
Thread wires are supplied in sets of three and are made to sizes specific to a given pitch of thread so they will contact on the pitch line as shown in the sketch. This enables a measurement to be taken over those wires (MOW) using a micrometer for most commercial applications as shown. A “constant” value based on the actual wire diameters is deducted from the reading obtained to arrive at the pitch diameter.
Substituting wire diameters will require a different constant to be used which means generic values from a chart are not suitable. Variations in wire size can be significant and increase the differences between methods used. For example, a diameter difference of 0.001 inch (0.0254 mm) in the wires will change the reading by 0.003 inch (0.0762 mm) because they are seating in a 60° included angle. Measurements of pitch diameter using devices that contact the thread in different ways or over a greater area of contact will not produce accurate results.
The awkward nature of this measurement has led to the development of other devices in an attempt to make it easier to perform, but there can be pitfalls in using them, especially if the pitch diameter is close to product limits. One such instrument is the trusty ‘pitch’ mike used by screw machine operators around the world. The simple version of these devices incorporates a conical spindle and a rear anvil that looks like a miniature v-block.
Pitch micrometer anvils do not measure pitch diameter as an isolated element because they contact the thread along the flanks of the form compared to thread wires that contact the form at the pitch line only. The differences in the readings can amount to several thousandths of an inch or as much as 0.1 mm or more. These discrepancies can be reduced if the micrometer is set to a calibrated thread plug gage of the same size and pitch of the thread to be measured. But if the thread form is poor, variations because of this will directly affect results.
Thread comparators that employ threaded rolls or segments as their contacts can cause the same problems, particularly if the wrong type is used. Multi-rib or “functional” rolls on these instruments engage several threads at one time so pitch errors in the product have a significant effect on the readings obtained. If you intend to use these devices for pitch diameter measurements, ask their maker to supply rolls or segments specifically for this purpose.
Optical comparators or toolmaker’s microscopes are essential for measuring thread form and may be used with overlay charts to qualify overall thread size. However, like other devices, they do not check pitch diameter as a single element and deviations can be significant.
The “three-wire” method of measuring pitch diameter is used around the world by fixed limit gage makers or laboratories that calibrate them. In their case however, they use instruments that are more accurate than the usual micrometer, special measuring forces and work in a controlled climate facility to do so.
Looking for a reprint of this article?
From high-res PDFs to custom plaques, order your copy today!


