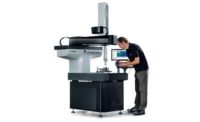
NORTH KINGSTOWN, RI — Hexagon Metrology has announced the release of the new TIGO SF coordinate measuring machine (CMM) for the North American market. The TIGO SF is a highly accurate and compact 3D CMM specifically designed for use on the shop floor. With a measuring volume of 500 x 580 x 500 mm, the machine boasts a volumetric accuracy making it the most precise shop floor CMM in its category. The new product is the ideal measurement solution for a wide range of small- and medium-size parts produced by industry sectors such as small-scale power generation, electronics, aviation and automotive, as well as general purpose measurement applications on the shop floor. Hexagon Metrology will demonstrate the new shop-floor CMM in Booth E-5202 at IMTS 2014, September 8 - 13, McCormick Place, Chicago, IL.
Several features ensure the TIGO SF’s level of precision, even in the demanding conditions of the shop floor. The CMM’s enhanced structural thermal compensation allows measurements in a temperature range from 15 to 30° C (59 to 86° F). Passive dampers protect the machine from most common vibrations on the shop floor. For extra protection, active dampers are available. Additionally, the machine is fully equipped with covers and bellows to prevent contamination of the moving parts. The machine stand that houses the electronic equipment is also available in an IP54-certified version. Since the TIGO SF is compact and compressed air is not required, it can be placed seamlessly in production cells or in any area of the workshop. Its robustness and reliability ensure maximum operating time.
“When we started developing this machine, we wanted to guarantee high precision and an unsurpassed level of user experience. We aimed at making inspection easier and more efficient than ever on the shop floor. User experience focused our attention on even the smallest detail,” said Anna Maria Izzi, product manager. “TIGO SF combines innovation and tradition, ease of use and flexibility, in a compact and ergonomic shop-floor CMM.”
The TIGO SF comes standard with the ultra-high accuracy HP-S-X1C probe sensor to support scanning and point-to-point measurements. Alternatively, TIGO SF can be equipped with the indexable HH-A line of probe heads, reaching more than 3,000 different positions to allow measurement of features on the workpiece, no matter their orientation. In addition to those features, TIGO SF offers a new way to interact with a shop-floor measurement device. The core of the operating concept is the PC-DMIS Touch software, designed for touchscreens and the latest generation of operating systems. The user interface shows easy-to-understand graphical elements and commands, providing the basis for an intuitive measurement process. PC-DMIS Touch guides users from one step to the next so even personnel not familiar with automatic measurement systems will learn to use TIGO SF after only one day of training. For more demanding applications, other metrology software is available.
TIGO SF is immediately available in North America from Hexagon Metrology’s commercial operations and its network of dealers.


