CMM Laser Scanner

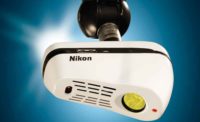
Nikon Metrology introduces its latest CMM laser scanner, the Nikon InSight L100. Nikon’s improved optics combined with innovative camera technology resulted in this new Nikon scanner. The InSight L100 CMM laser scanner offers the best possible combination of speed, accuracy and ease-of-use. Suited for both surface and feature measurement, even on shiny or multi-material parts, the Insight L100 quickly delivers accurate data and insightful part-to-CAD comparison reports.
The InSight L100 is ideal to inspect larger components where productivity is key but without having to compromise on accuracy. The 100 mm wide Field-of-View combined with the data acquisition speed of 200,000 points/second results in a measurement productivity that wasn’t achievable with CMM scanning before.
To facilitate manual scan path programming, the InSight L100 features a brand new full Field-of-View (FOV) projector. By making sure that the scan line falls within the projected FOV, the user can be sure that he gets good part coverage.
The InSight L100 is equipped with a high quality glass Nikon lens optimized for laser scanning. Combined with the high definition camera, this results in a point resolution of only 42 μm enabling fine detail capture and measurement of sharper edges. The InSight L100 has an exceptionally small probing error of 6,5 μm -which is a measure of the scanner’s noise level- resulting in smooth meshes with high levels of detail.
The InSight L100 is perfectly suited for combined surface and feature measurement. Thanks to the low noise level and high point resolution, feature measurement accuracy approaches the accuracy of a touch probe.
A greater range and mix of surface materials, finishes, colors and transitions can be measured more efficiently without user interaction, manual tuning and part spraying. Nikon Metrology’s unique fourth-generation Enhanced Scanner Performance (ESP4) technology adapts the laser intensity for each point in the scan line to varying colors or materials faster than ever. This makes the scanner even more robust for digitizing multi-material assemblies or shiny surfaces without the need for cumbersome surface treatment.
The patent-pending integrated mount rotation allows the scanner to rotate around its autojoint axis in 30° increments up to 90°. This saves the use of autojoint adaptors and is particularly interesting to measure turbine blades or parts with vertically oriented features and edges. The InSight L100 also allows the use of an extended 105° PH10 A-angle allowing better access to measure underneath or behind parts.
By utilizing laser scanning, manufacturers can gain full insight of the dimensional quality of their products without compromising on cycle times. As the entire part is checked to CAD model, any areas of concern are immediately highlighted using color mapping. Further investigation and analysis is possible using fly-outs, sections and a library of Geometric Dimensioning and Tolerancing (GD&T). As a picture is worth a thousand numbers, these easy-to-interpret graphical reports facilitate exchange of results with internal or external colleagues or suppliers. This ultimately leads to easier decision-making, faster corrective actions and shorter time-to-market.
The InSight L100 scanner can be combined with tactile probes and change rack to create a versatile fully automated multi-sensor CMM. Depending on the application both technologies can be used independently or together within the same inspection program. The InSight L100 can also be retrofitted to a wide range of CMM brands.
Nikon Metrology
Looking for a reprint of this article?
From high-res PDFs to custom plaques, order your copy today!


