Measurement with Micrometers
With many different types of micrometers to choose from, how can you be sure to select the best one for the job?

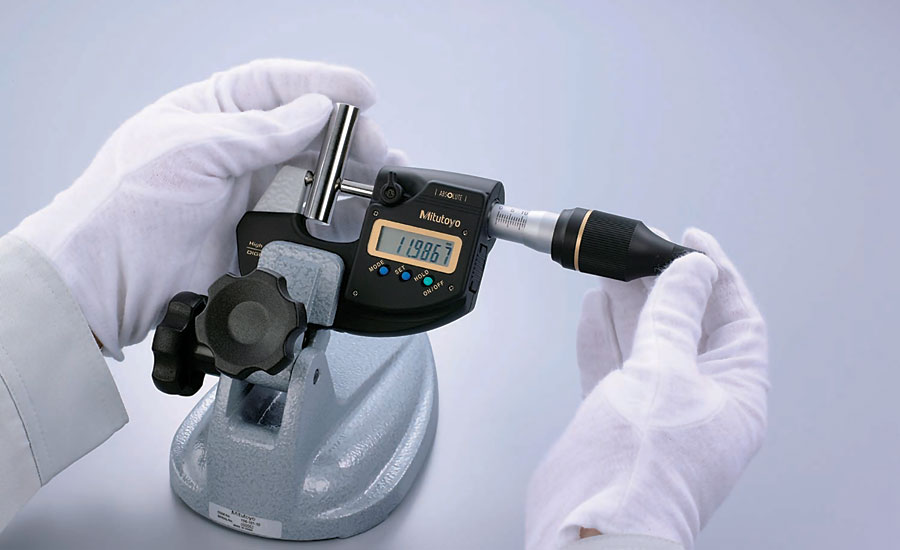
The industry is starting to see an increase of submicron resolution micrometers for those who need to make highly accurate measurements with a handheld tool. Source: Mitutoyo

Micrometers provide a high level of accuracy and stability unmatched by many other handheld gages. Here is a rachet thimble micrometer. Source: Mitutoyo

Coolant-proof micrometers are free from measurement error and physical deterioration due to routine exposure to water, cutting oil or coolant. Source: Mitutoyo

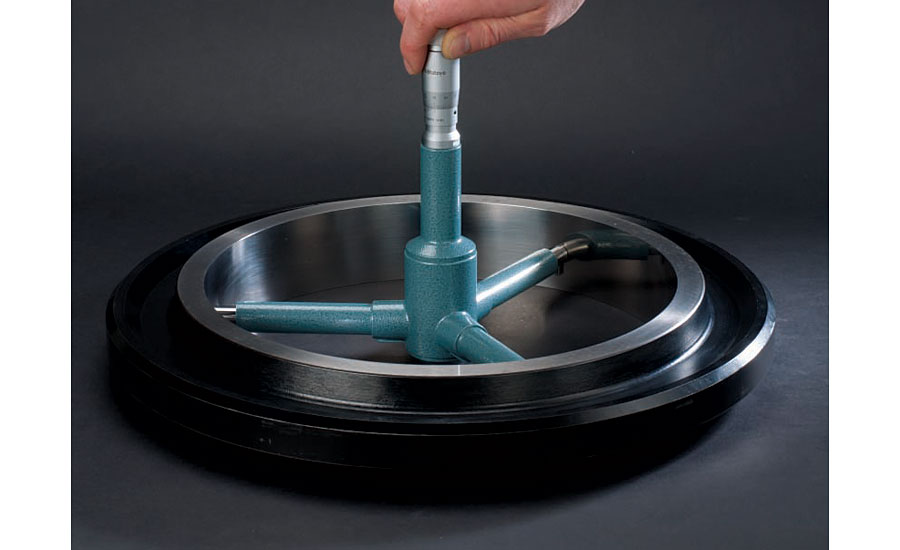
Inside micrometers measure the inside dimension of an object such as tubing or a cylinder. Source: Mitutoyo


Hand tools are the workhorse of the industry. Every metrologist has a variety of hand tools in his toolbox. You’re sure to find one, two or several micrometers in that toolbox to accurately measure thickness, outer and inner diameters, as well as depth of slots. Despite a relatively short measuring range, micrometers provide a high level of accuracy and stability unmatched by many other handheld gages.
You will likely find both analog and digital micrometers in that toolbox. Despite the introduction of electronic micrometers, analog micrometers are still widely used today and are the preferred model for many veteran workers. While today’s digital micrometers are more accurate than mechanical micrometers, mechanical models are less expensive and easier to maintain without the need to replace a battery. In addition to accuracy, an advantage of digital micrometers is the dual inch/metric reading. With digital models data can be recorded, printed or downloaded to a computer, and wireless data collection allows for easy data transfer, saving time and eliminating errors.
Tech Tips
|
With many different types of micrometers to choose from, how can you be sure to select the best one for the job? This primer will help determine appropriate use for many types of micrometers.
Outside micrometers
The most common micrometer, an outside micrometer, is used to measure outer dimensions that are round or rectangular, as well as other shapes. Common measurements include shaft diameters and sheet metal. Standard micrometers with flat anvil and spindle faces are limited to measuring workpieces that are equally flat, parallel or cylindrical. While most people are familiar with outside micrometers, a variety of special purpose micrometers are available to address the needs standard micrometers cannot.
Screw-thread micrometers measure the pitch diameter of a screw thread and are mainly used for measuring pitch diameters of triangular threads. There are special-purpose screw-thread micrometers for measuring pitch diameters of square threads, trapezoidal threads and ball screw threads. The most important requirement to ensure interchangeability between screws is the fit of the mating external and internal threads.
The gear is one of the most important elements of machines, and the measurement of gears is often required to ensure the intended performance of a machine. Gear-tooth micrometers are generally used for measuring root tangent length, tooth thickness and over-pin diameter.
Sheet metal micrometers check the thickness of sheet metal during the rolling process, as well as during final inspection. Because the micrometer frame has a deep throat, it can measure thickness at portions deep inside the edge of sheet metal. Some micrometers have a dial for easy reading.
O-ring grooves and other recessed areas are difficult to measure. Without a special configuration, such as a non-rotating blade micrometer, it is impossible to measure the recessed diameters flanked by flanges. To measure the distances sandwiched between the flanges in a longitudinal direction along the axis, a groove micrometer may be used. Blade micrometers feature a non-rotating spindle in which the blade advances and retracts in a straight manner.
When narrow grooves cannot be measured with a standard, flat-faced micrometer, disc micrometers may be in order. Another application for the disc micrometer is to measure the thickness of sheet metal that is too thick for a standard outside micrometer.
When the dimension specified is a curved surface, a standard outside micrometer with a flat anvil and flat spindle cannot adequately measure the curved wall thickness. A standard micrometer will always measure larger than the actual thickness, thus leading to reading errors. To overcome this, a spherical micrometer with a spherical anvil or spherical anvil and spindle can be used.
With spline micrometers, the anvil and spindle have a small diameter to measure spline shafts, slots and keyways. The specifications are similar to those of standard outside micrometers; however, the standard measurement size is 3 mm (diameter) x 10 mm (length).
Point micrometers have a pointed spindle and anvil. They are used for measuring the web thickness of drills, root circle diameters of external threads, small grooves and other hard-to-reach portions.
Can seam micrometers are designed specifically for measuring the widths and heights of can seams.
V-anvil micrometers measure the outside diameter of cutting heads—such as taps, reamers and mill ends—with an odd number of flutes that standard micrometers cannot measure.
Depth micrometers
Regular outside micrometers and depth micrometers both make use of the same spindle and graduations except that the order of the graduation in depth micrometers is reversed. The resolution of the digital depth micrometer is higher than conventional line-graduated depth micrometers. With either micrometer, the reading increases as the rod descends deeper and moves away from the base. One of the reasons the depth micrometer is an ideal tool for measuring steps and depths can be attributed to its base. The bottom surface of the base is flat and ground, some of them lapped, to make sure the reference plane is adequate for the intended job. Like a standard micrometer, some prefer a depth micrometer to other products due to its stable measurement.
Most depth micrometers feature interchangeable rods. The longest rod may reach up to 12 inches. With the manual line-graduated models, the smallest reading is 0.001 inch. It is suggested that the length or the rods be validated by gage blocks whenever they are switched.
Inside micrometers
Inside micrometers measure the inside dimension of an object such as tubing or a cylinder. Like outside micrometers, inside micrometers are also available in application-specific types. They are classified as tubular inside micrometers, caliper-type inside micrometers and three-point type inside micrometers.
Tubular inside micrometers are available in several types: single rod, extension type, interchangeable rod, interchangeable tip and internal gear measuring. The single rod is the most widely used inside micrometer. Tube micrometers are designed to measure wall thickness of tubular parts, such as sleeves and collars. They also can be used for measuring from the inside of holes that are too small for the anvil end of a standard micrometer to be inserted.
Tubular inside measurements take a comparatively long time for making measurements. The longer handling time increases the effect of heat on the micrometers which can substantially increase its length, resulting in a minus error. To minimize the thermal effects, the inspector should always wear gloves and try to minimize measuring time.
Caliper-type micrometers require more skill to use because the micrometer must be accurately aligned with the diametral line of the hole being measured. To measure hole diameters, the jaws are inserted into the space to be measured and are adjusted using the ratchet.
The three-point inside micrometer is simpler to use than a caliper micrometer because it aligns itself with the hole axis by means of three evenly spaced anvils. This allows accurate measurements to easily be made without any special skills. It uses a tapered part, either a cone or thread, for converting the spindle’s axial displacement to the radial displacements of the contact points.
Other considerations
Indicating micrometers can accommodate a dial indicator or linear encoder probe. The anvil can move a small distance in the axial direction and its displacement is shown on the indicator. In ordinary micrometers, the spindle rotates with the thimble as it is displaced in the axial direction. The nonrotating spindle does not turn as the spindle is displaced. Because the nonrotating spindle does not produce radial torsion on the measuring faces, wear on the measuring face is greatly reduced. This type of micrometer is suitable for repetitive measurements or measuring workpieces with coated surfaces, fragile workpieces and workpieces that require a specific angular position of the spindle’s measuring face.
Adding to their durability and longevity, coolant-proof micrometers are free from measurement error and physical deterioration due to routine exposure to water, cutting oil or coolant. This high performance is achieved by using encoders that are inherently immune to contamination, where exposure is inevitable, combined with comprehensive sealing techniques and extremely oil-resistant materials to guarantee a long working life under normal operating conditions.
Moving forward, the industry is starting to see an increase of submicron resolution micrometers for those who need to make highly accurate measurements with a handheld tool. Contributing to the high resolution is a rigid frame, as well as a heat shield that minimizes errors caused by thermal expansion. In addition, newer models have an absolute rotary sensor that eliminates the need to perform an origin setting every time the micrometer is turned on, allowing the operator to start measuring right away.
With the variety of micrometers available, from inside to outside and specialty, there are sure to be several that will help you meet your measuring needs.
Looking for a reprint of this article?
From high-res PDFs to custom plaques, order your copy today!


