First Article Inspection with 3D Scanning
A growing number of companies are including this technology in their first article inspection procedures.

GD&T analysis

2D color deviation vs. CAD cross-section

3D color deviation vs. CAD model


With continuous advances in optical inspection technology yielding 3D scanners that are today capable of stunning speed and accuracy, a growing number of companies are including this technology in their first article inspection (FAI) procedures. The key benefit of using an instrument that rapidly collects millions of data points is that all part/assembly dimensions can be measured in far less time; and in the case of CT scanning, internal measurements can be taken without destroying the parts.
Traditionally, FAI utilizes coordinate measuring machines (CMMs). The majority of CMMs implement a touch probe to acquire points one at a time. There has been progress in recent years with some tactile probes now moving to allow streaming of points but most CMMs still take only one measurement/point every few seconds.
The most common methods of collecting noncontact 3D measurements are: handheld laser scanners with or without a portable CMM arm, computed topography (CT), structured blue/white light scanners, and CMM mounted scanners. The best choice for any FAI scenario will depend on the accuracy required, size of the parts, and whether internal features must be captured as well. For example, since a handheld scanner is capable of capturing 3D measurements from objects of almost any shape, it would be a good choice for measuring mid-size consumer products like sports equipment and furniture, whereas a CMM scanner is a better choice for objects requiring higher accuracy, such as turbine blades. On the other hand, CT scanning, with its ability to nondestructively measure internal components, would be the best choice for inspecting wall thickness of HVAC tubing or medical devices with critical internal geometry.
There are a number of industry approved inspection software packages that are able to analyze the high-density point cloud data or stereolithography (STL) data from the scanners. Some companies may require specific CMM software to analyze the data. For these cases, there are various software packages that will act as a “virtual CMM” and are programmed to measure the STL “virtual part” and generate a report exactly as if it had been probed on a CMM.
FAI using scan data can be carried out by using a 2D print of the part for comparison, but a much more comprehensive inspection can be done if a 3D CAD file for the part/assembly is available. A CAD model is almost essential if any geometric dimensioning and tolerancing (GD&T) operations are required.
After the measurements are taken, the data can be first aligned using “best fit” algorithms or “N-Point” alignment, followed by a more accurate alignment created using datum features. Once aligned, a number of inspections operations are available:
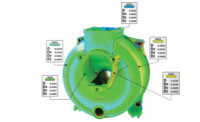
- Color deviation map (“heat chart”) of the entire scanned surface area. Data above the CAD surface moves towards red in the color spectrum while data below the CAD surface moves toward blue. Alternately, this color chart can be presented as a “go/no go” image. In addition, points of interest can be clicked on to check their deviation, which is shown with a flyout. Wall thickness can be automatically calculated and displayed as a separate heat chart.
- 2D cross-sections can be taken at any position/angle, compared to the CAD file, and presented with “whisker-plots” colored to indicate their deviation. Here again, points may be clicked and their deviation displayed.
- 2D cross-sections can be selected and analyzed with 2D dimensions, including the use of theoretical points and lines.
- Geometric forms such as cylinders/planes/circles can be extracted from the CAD file, created automatically from the scan data, and compared.
- All standard GD&T operations can be carried out on the data set. Most applications require the use of a CAD model.
All FAI results can be saved in a custom report in various formats, usually PDF, including full statistical analysis of the 2D and 3D surface deviations.
If the same part is to be re-measured at a later date, then the same reports can be created with little effort, including batch analysis of multiple data files of the same type. The ability to generate the same reports with new data also enables the use of trend analysis for forecasting future problems.
FAI is poised to enter a new era where even the smallest deviation from an original design can be detected and quickly corrected. Three-dimensional scanning offers a clear win-win opportunity for manufacturers: save time and improve quality while delivering a better product to your customer.
Looking for a reprint of this article?
From high-res PDFs to custom plaques, order your copy today!


