Controlling the Accuracy of a Shop Floor CMM
Understanding the influence of temperature on your CMM.

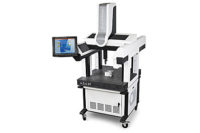
This CMM offers temperature compensation to ensure accuracy in changing shop floor conditions. Source: Hexagon Manufacturing Intelligence

Graph 1: This graph depicts the conventional method of CMM accuracy specification as a function of the ambient temperature (discrete steps). Source: Hexagon Manufacturing Intelligence

Graph 2: This graph depicts the comparison between two different methods of CMM accuracy specification as a function of the ambient temperature (discrete steps and continuous). Source: Hexagon Manufacturing Intelligence

Information is displayed on an easy-to-understand dashboard. The dashboard also displays full history of all events that have occurred on the given CMM. Source: Hexagon Manufacturing Intelligence

This environmental monitoring software is designed to detect vibration, temperature, humidity, crash notifications and more. Source: Hexagon Manufacturing Intelligence


Fine-tuning coordinate measuring machines (CMMs) to the functional needs of manufacturers has changed the way they view quality inspection. The industry trend of moving dimensional inspection from thermally controlled metrology labs to the shop floor introduces newfound efficiencies and process insights. This evolution also presents the need to understand how temperature influences CMM accuracy.
Why Temperature Matters for CMMs
Compared to other environmental factors found in a factory, ambient temperature can have the most impact on a CMM’s accuracy and repeatability. Changes in temperature can affect the scales, machine structure and artifacts being measured to expand, contract, and, in some cases, distort in a non-linear manner.
Though often compensated for in a variety of ways, these thermally induced changes can lead to significant measurement uncertainty, particularly in the context of measurement on the shop floor, where temperature can be difficult to control.
Traditionally, the thermal dependence of a CMM’s accuracy has been specified as an industry standard using broad temperature bands centered about 20°C (68°F). Historically, this standard was set in 1931, as international entities agreed that objects have their correct size at this temperature. Therefore both the CMM and the part would need to be the same temperature. According to scholars of the subject, this decision was not based on physics. The group collectively selected the temperature to ensure measurements taken in one country would concur with those obtained in another country.
For instance, a manufacturer might specify a hypothetical CMM’s maximum permissible error (MPE) of indication for size measurement, MPEE, per industry standard ISO 10360-2 over a temperature band of 18-22°C (64-72°F) as:
MPEE = 3.0 + 3.0 * L / 1000
Where MPEE is in microns, and L is the measurement length in millimeters.
While this is a logical way (for both the CMM manufacturer and the user) to specify the temperature dependence of CMM accuracy for a machine in a lab environment, the logic falls apart for machines installed and used in an environment where the temperature is not well controlled over both long and short time scales.
While a single temperature band specification (whether it is wide or narrow) is convenient for the CMM manufacturer, the customer is left with only the manufacturer’s conservative, but not terribly detailed estimate of how machine accuracy changes with temperature. After all, a primary reason customers purchase a shop-floor machine is to position it in a location where the ambient temperature will, in all likelihood, impact the CMM’s measurement accuracy.
Stair-Step Specifications
Typically, CMM manufacturers have attempted to deal with this problem by specifying accuracy by way of multiple temperature bands. Again, consider a hypothetical CMM with accuracy specified as:
MPEE = 3.0 + 3.0 * L / 1000 (18-22°C)
MPEE = 3.3 + 4.2 * L / 1000 (16-26°C)
MPEE = 3.5 + 5.0 * L / 1000 (15-30°C)
Where MPEE is in microns, and L is the measurement length in millimeters.
With a measuring length L of 500 mm, the MPEE is portrayed graphically as a step function of ambient temperature.
Continuous Thermal Specifications
Considering the physics involved when metrology frames expand, contract and distort with changes in temperature, we intuitively know that this type of step function is inaccurate. Metrology structures do not normally exhibit changes in accuracy as a step function of temperature, with instantaneous degradations in accuracy occurring when the temperature crosses some threshold value. Or, if they did exist, we probably would not want to make measurements with them.
Clearly, a more detailed description of CMM accuracy under varying ambient temperature conditions is needed in environments that lack sufficient thermal controls. A more physically realistic alternative is the specification of accuracy as a continuous function of ambient temperature. And from the pragmatic viewpoint of the metrologist or quality engineer, it is eminently more useful.
To illustrate the point, let’s take a look at an actual CMM. Consider the accuracy statement of the 4.5.4 shop floor (SF) CMM:
MPEE = 3.1 + 0.05 * ∆T +
(3.0 + 0.2 * ∆T) * L / 1000 (15-40°C)
Where ∆T is the departure of ambient temperature from 20°C
Again, consider a measuring length of 500 mm and plot MPEE as a function of ambient temperature. This time we find a more physically intuitive result and one that is much more useful to the metrology practitioner.
The usefulness of the departure of ambient temperature is further demonstrated when displayed on the same graph of the previous hypothetical example where performance was specified over a series of broad thermal ranges.
In addition to providing the user with a more precise picture of the CMM’s accuracy at varying temperatures, a continuous specification is a compact and elegant way of defining machine accuracy specifications and is particularly well suited to being incorporated into automated reporting of measurement results.
Temperature Variation Over Time
Another factor to take into consideration when one is equipped with an extended temperature range specification, continuous or not, is the permissible temperature changes that the manufacturer specifies over time. Normally this is expressed as the change within a one-hour and a 24-hour period. This specification tells the user how much temperature variation is allowed over a given time interval to maintain the specified accuracy performance. A larger permitted change in any given period means the machine is better able to cope with changing shop thermal conditions.
New Ways to Limit the Effects of Temperature
Over the last five years, there has been a shift in the way CMM manufacturers design shop floor systems. Today, engineers are looking at new ways that can turn what was once a reactive system to a proactive and ultimately, more predictive system. The development of CMM monitoring software that continuously measures the temperature, humidity, and vibrations, offers the next generation of data-driven, predictive technology that improves the performance and accuracy of a CMM.
Furthermore, this technology can also capture the movement of the machine by monitoring the CMM’s Z-column forces using an accelerometer, and when a large disruption occurs, it can report and record a crash. How this starts to become a proactive environment is now CMM manufacturers can inform the user of the severity of that crash, and even notify if service is required.
As instances occur, these monitoring systems can immediately inform you via a short message service or an email within minutes of the occurrence. The ability to monitor the environment of the machine, in real time, and be aware of any disturbance creates the foundation for a proactive manufacturing system. By incorporating these kinds of systems into shop floor production plans, manufacturers can take their production to the next level of speed and productivity.
Practical Advice for Shop-Floor Deployment of a CMM
When choosing to deploy a CMM on the shop floor, it is important to evaluate the measurement tasks you need to perform, and calculate an uncertainty budget. Then, calculate the accuracy of the machine using a continuous thermal specification at all the different temperatures that the shop may encounter, ensuring that it does not exceed the total thermal variation per hour or per day. This gives the user the expected accuracy of the machine at any time of day. By incorporating environmental monitoring software within the shop floor system, manufacturers can also monitor the performance of their machine and track any inconsistent behavior to ensure that their CMMs are always running in optimal conditions.
The use of a CMM with a continuous thermal specification on the shop floor equips the CMM user with a more complete picture of a machine’s expected performance in an uncontrolled environment. This enables better decision making, and more confidence in measurement results.
Looking for a reprint of this article?
From high-res PDFs to custom plaques, order your copy today!


