Addressing the Quality Control Challenges of Effect Finishes
New measurement technologies are coming on the market to better control color and appearance.

Objects may have several elements that affect appearance, such as the material’s surface texture, construction, overall geometry and micro-surface.
Special effect finishes and other appearance-enhancing materials, long a staple in the automotive industry, are now making their way into everything from appliances and consumer electronics to toys, cosmetics, and containers for personal care products such as shampoo. This includes everything from aluminum flakes for a metallic look to highly advanced materials that include multi-color sparkles that change color and appearance based on lighting conditions and viewing angle.
These complex materials take the quality control challenge beyond simply measuring color to the inclusion of appearance characteristics that have been difficult to quantify in the past. These characteristics have traditionally been assessed with the exclusive use of visual evaluation by the human eye. While this is still an important element of any quality control process, it is subjective and leads to errors. A better approach would be to quantitatively assess a pass/fail status for products using a combination of instrumentation and image analysis techniques.
The good news for brands, manufacturers and quality control professionals who have been struggling with these challenges is that new measurement technologies are now coming on the market to better control color and appearance. These devices make it possible to establish and quantify appearance tolerances for color, sparkle and coarseness—three common characteristics of effect finishes. The ability to precisely define and control effect finishes commonly used in the automotive, plastics, coatings, and cosmetics industries reduces waste and accelerates the product design-to-production process.

The environment in which the object is viewed or used, which involves the illumination, context, as well as an observer, also plays a role in how an object’s appearance is perceived.
To understand why effect finishes have been such a challenging issue for production, it’s important to take a look at what is meant by “appearance characteristics.”
How Appearance Affects Color
Assessing appearance of a final product or the materials being used to create the final product requires more than simply measuring color with a spectrophotometer. It requires a comprehensive look at everything inherent to each unique material being used, including texture, gloss, transparency, and special effects. Each of these characteristics plays a role and has an effect on overall appearance that needs to be taken into consideration when evaluating quality.
Objects may have several elements that affect appearance, such as the material’s surface texture, construction, overall geometry and micro-surface. The environment in which the object is viewed or used, which involves the illumination, context, as well as an observer, also plays a role in how an object’s appearance is perceived.
Often, appearance characteristics are not accurately communicated or represented across the design-to-production workflow. Incorrect appearance matching is often a catalyst for lengthened approval cycles, slower time to market, and higher production costs, especially due to the cost impact of waste and rework. It can also affect the satisfaction of the end-use customer.
As a specific example, consider an image of a blue automobile. “Blue” describes the car in a way we can understand and communicate—for instance, directing someone to the correct vehicle in a parking lot—but there are many things it doesn’t describe:
- The way the color changes to teal under direct light.
- The dark blue, almost black, appearance in the shadows.
- The mirror-like reflection from the high gloss finish.
- The shimmering sparkles from the special effect pigments.
Is Color Measurement BLIND to Appearance?
As early adopters of effect finishes, quality control professionals in automotive quickly found out that traditional spectrophotometers, whether multi-angle, sphere or 45:0 geometry, were blind to the finer nuances of color and appearance. It’s important to remember that spectrophotometers are designed to measure color (and in some cases gloss). That’s their job. These devices shine light at specific angles and measure a specific point, only capturing and averaging the color that occurs in that target area. Spectrophotometers can do this with exceptional accuracy and repeatability.

Consider the image of this automobile. “Blue” describes the car in a way we can understand and communicate—for instance, directing someone to the correct vehicle in a parking lot—but there are also many things it doesn’t describe.
But many effect finishes are designed to create a mirrored or multi-colored effect. Since spectrophotometers are designed to average the colors, the results may not coincide with what the quality control person is observing.
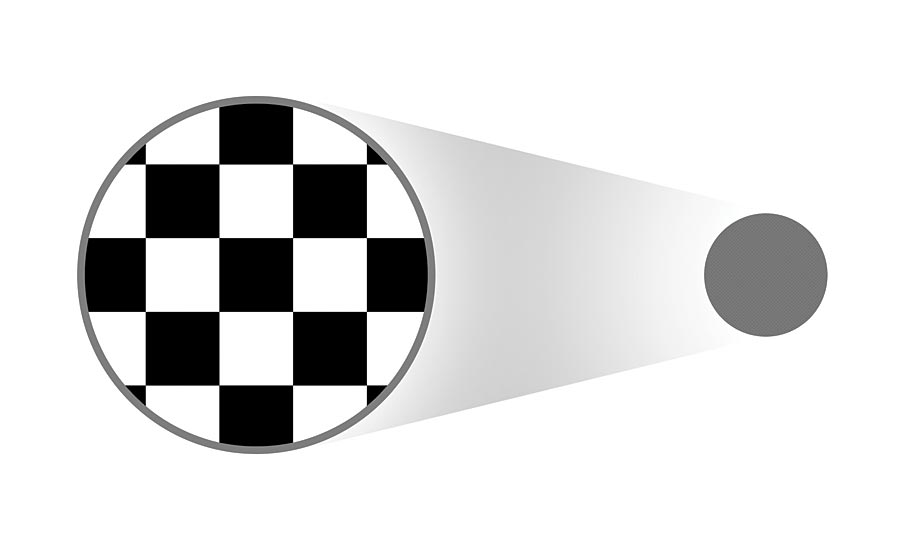
Think about a black-and-white checkerboard image. A spectrophotometer would average the black and white, returning a measurement that reflects gray. However, the human eye will clearly view black squares and white squares. Now consider the blue car image, and exponentially magnify those differences between what the spectrophotometer sees in a specific location versus what the eye sees when viewing the vehicle as a whole, especially as lighting conditions change.
Emergence of Full-Color Imaging Spectrophotometers for Measuring Effect Finishes
Color technology has continuously evolved to better address the issue of color and appearance. And a new technology has emerged for both formulation and quality control professionals that combines spectrophotometry and full color imaging. These new imaging spectrophotometers include a full-color, high resolution on-board camera combined with software that performs image analysis on the captured image. While there have been black and white imaging spectrophotometers available on the market for some time, they were still limited in their results—especially for multi-colored effects.
Combining an on-board color camera provides a live video feed of the image area to be captured. Operators can more carefully target the area to be measured, and once the measurement is taken, the image is stored for purposes of analysis, reporting (audit trail) or other future uses. When specific tolerances are set in the accompanying software for both color and appearance characteristics, a pass/fail notification is provided that lets the operator know the product did not meet all of the specified tolerances. This identifies problem areas so formulation or quality control professionals can take the appropriate steps to solve the problem. This will take the assessment of color and appearance to a new level, and help introduce more consistency across even the most complex manufacturing supply chains, and address the most sophisticated special effect finishes.
With an imaging spectrophotometer, in the checkerboard example used earlier, the spectrophotometer will still average black and white to get a reading of gray but the on-board imaging device will detect the individual colors. Likewise, in measuring something as complex as the blue automobile, the imaging component will be able to detect and accurately measure and quantify shiny, mirror-like surfaces, or the effects of aluminum flakes. It can even measure the amount and color of the sparkles, and the coarseness of the sparkles contained in sophisticated materials such as the new Xirallic pigments—all at the pixel level. These devices are able to do that in full color in a repeatable and accurate manner. The result is a pass/fail determination with data captured in a single measurement action, and the ability for formulation and quality control professionals to more quickly key in on and correct issues.
The Bottom Line
Special effect finishes are everywhere, and while they can significantly enhance the appeal of products, they are creating headaches for formulation and quality control professionals who must determine whether both color and appearance meet expectations. This is only going to get more complicated as more complex materials are used across a broader array of products. Complex pigments, such as Xirallic, typically begin their life journey in the automotive industry with very high value products that can support the extra cost. As costs come down, these materials migrate into other high value products, such as appliances, consumer electronics and cosmetics; and eventually to lower cost products such as toys. And the transition is happening relatively quickly—even five years ago, you didn’t see these special effect finishes across such a broad array of products.

With a black-and-white checkerboard image, a spectrophotometer would average the black and white, returning a measurement that reflects gray. However, the human eye will clearly view black squares and white squares.
The key to alleviating quality control headaches is imaging spectrophotometers that work in conjunction with a software solution that can take the results from both the color measurement and the image at the pixel level, process them, compare results to the sample or standard, and notify the operator whether it passed or failed. A sample might meet the color tolerance but not the appearance tolerances, or vice versa, but would need to pass all of them in order to meet quality control requirements.
We are just at the dawn of this technology today, and there are more developments to come. But at least at the outset, imaging spectrophotometers will bring huge change to both formulation and quality control. We anticipate as they roll out to the market that customers will push the envelope even more, driving new uses and applications that we haven’t even imagined yet, and also spur further development of these technologies.
Looking for a reprint of this article?
From high-res PDFs to custom plaques, order your copy today!


