Are You Maximizing the Benefits of Metrology Fixturing?

Custom CMM fixture to hold 12 parts. Parts are elevated above the base allowing access to the probe for under part profile checks. Part locates against locator pins and is held in pace with a forked down-force spring clamp. Source: Renishaw
Within a metrology inspection environment, fixturing is a three-step process of positioning, locating and securing a workpiece within a measuring volume for inspection. Whether this inspection involves a coordinate measuring machine (CMM), vision machine or flexible gaging system, the goal of the fixture is to hold the part securely and repeatably. A well designed and manufactured fixture will remove operator variance and help to ensure consistency of inspection.
The true benefits of precise metrology fixturing and how it can significantly affect the efficiency of an inspection process are largely underestimated. It is commonplace for fixtures to be neglected until the last minute of a project, or even worse, forgotten altogether. It is only when a CMM backlog starts to build or metrology results drift that the focus is drawn to the part fixturing and positioning within the machine. By then, it is generally at the expense of lost time and money, and the costs of implementing suitable control measures retrospectively are increased. Within the productive process pyramid framework for process control, the post-process monitoring phase is the final step to ensure effective end-to-end metrology. It is within this phase that consideration needs to be given to the fixturing solution to maximize the effectiveness of a CMM, vision machine or flexible gage. There are many benefits that the correct use of metrology fixturing can bring to your inspection process. This article will focus on the top three considerations: repeatability and reproducibility, part positioning and productivity, and cost reduction.
Repeatability and reproducibility
Fixture repeatability is a significant factor when considering the consistency of metrology data, which is especially important in high volume, large batch inspections. A correctly engineered metrology fixture can ensure positional repeatability. Although many modern inspection machines can mitigate micro alignment and workpiece positioning errors, large discrepancies in part positioning can result in unnecessary rejections and metrology data errors. Efficiency is also compromised with operators ‘looking for’ or locating part datums relative to the fixture prior to inspection. Therefore, a fixture needs to be sufficiently repeatable to ensure that a workpiece can be removed and replaced without fluctuating datum features.

Custom vision fixture to hold 32 parts. Parts nest against dowel pins on two sides and are secured with a ball spring plunger. Source: Renishaw
Reproducibility of a fixture can also be a significant influence in maintaining high throughput on an inspection machine. In some production environments, custom fixtures will be available to suit a specific workpiece. However, when cost, time or limited storage space is a challenge, modular fixtures are the best option. When modular fixtures are used, it is beneficial to use a fixturing product which has been created so that the set-up can be documented and recreated to exacting specifications to ensure reproducibility. One of the benefits of using modular fixturing is that fixture components can easily be positioned into specific alphanumerically labeled hole positions, and then recorded for future use or quality standards documentation.

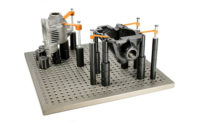
Here’s a modular CMM setup to hold a part utilizing pin standoffs, adjustable slides, standoffs and a spring pusher standoff clamp. Source: Renishaw
Part positioning
Due to restrictions in CMM working volumes, it is a common requirement to elevate the workpiece from the granite into the working volume, meaning either the part or the fixture needs to be elevated within the CMM volume to gain access for the stylus. Additionally, measuring machines will commonly have an optimum area within their working volume to ensure consistent measurement results.

Productive Process Pyramid. Fixturing comes in at the post-process monitoring stage to maximize the effectiveness of the CMM, vision machine or flexible gage. Source: Renishaw
This can present several issues when a suitable fixturing solution is not available, including the efficient orientation of the part within the machine. Firstly, if the part is heavy or has complex geometry, it can be very difficult to elevate and hold securely when correct fixturing has not been considered. Secondly, access to part features can be reduced due to having a bulky support structure underneath the part. As a result, the best method is a well-designed fixture that incorporates key requirements from the inspection process such as feature access, measuring volume restrictions and probe access. The various methods of workpiece elevation are achievable with modular and custom fixtures, with correct consideration and application of fundamental fixturing principles.

This modular vision setup uses standoffs and soft tip spring wire clamps. Source: Renishaw
Productivity and reducing cost
Repeatability and reproducibility are inherently linked when increasing the overall productivity of a machine. Using easily configurable fixtures can result in less downtime between setups, thus increasing the machine’s overall productive throughput. Another common sight in metrology inspection rooms is that of large machines being used to measure single parts. Even though the machine may have been purchased with future growth in mind, there is no reason not to utilize the full machine working volume. Adding multiple parts to any measuring area is a simple way of maximizing a return on investment and overall productivity of an inspection machine. Modular fixturing can even be used to create multiple part setup fixtures, even within limited budgetary requirements.
Employing the use of correct metrology fixturing during your part set-up and inspection processes can have a significant impact on your process, resulting in higher accuracy and saving you both time and money.
Looking for a reprint of this article?
From high-res PDFs to custom plaques, order your copy today!


