Choosing Sensors for your CMM
The goal of part inspection is to get results you can trust.

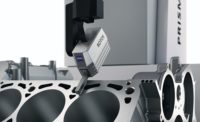
The instrument performs precise roughness measurements with flexibility
Sensors are an essential part of a metrology system, and there are several key factors that inform a buyer’s choice. These include ease of use, accuracy, speed and cost. Comparing the options can involve both analysis of features and actual demonstration of capabilities, but to get meaningful information for either you have to ask the right questions.
Years ago, a popular candy advertised “The milk chocolate melts in your mouth, not in your hand.” The statement was nominally true, but only because the milk chocolate was covered with a thin candy shell. And while the chocolate center was protected, the thin candy shell could melt in your hand leaving a sticky, rainbow-colored mess. If melted candy was your issue, the more meaningful question would have been “Will any part of this candy melt in my hand?” The same logic allows many different cars to be advertised as “America’s Best-Selling…” And if you Google “World’s Strongest Man” you’ll get over 80,000,000 hits, and they’re far from agreement on who owns that title.
Simply put, definitions matter, and that is particularly true in evaluating complex technical products. As a manufacturer of precision metrology systems, we care about having a correct definition. Like the melting chocolate claim, statements may seem valid or may actually be true in a limited sense but not tell the whole story.
Trusted Measurement Results
The goal of part inspection is to get results you can trust on the parts you measure, from part to part over the course of a production run. The accuracy of that inspection can tell you how well your production equipment is working and identify drift before it becomes a problem. The quickest way to judge your metrology equipment and how well it will work is its compliance with ISO 10360. This is the standard that defines qualification testing and performance verification of coordinate measuring machines (CMMs). Important to note is that the standard covers the entire CMM system including sensors and styli. Any accuracy claim for an individual component has only so much value when it is part of a larger device. The entire system must be considered in judging the reliability of its measurements and compliance with the ISO standard.

Choose from several sensors depending on the application, including the surface roughness sensor.
Speed
Fast measurement can be misleading. The real question is how much work a system can do in a given time, and that can include some non-measurement activities. Scanning speed, taken out of context, ignores questions like what triggers the need for recalibration. How often is it required in ongoing operation? How lengthy is the process? The point is that measuring speed is just one small part of a complex process that includes measurement plan design, programming, setup, calibration, part positioning, reporting, and more.
Taken out of context, speed is like the vehicle land speed record. Driven by twin Rolls Royce turbofan aircraft engines, the Thrust SSC took that title, literally breaking the sound barrier. But while it broke the record running on the Black Rock Desert, it wouldn’t fare very well on Germany’s autobahn, or in a NASCAR race, a Formula One race, or a sports car rally. Because it’s relatively slow off the line, Thrust SSC wouldn’t even win a drag race, where straight-line speed is all that’s expected.

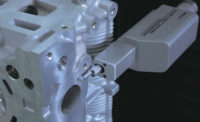
Modular design and rotation in three axes—each featuring ±180° of rotation.
But even if you only look at speed, you still have to make sure it’s an apples-to-apples comparison. For example, our software can optimize CMM scanning and reduce inspection time by as much as 80 percent. Similarly, a system that excels at a very specific type of measurement may not work so well for others. Whether shopping for a system or a sensor, make sure to evaluate its performance over the range of measurements you’ll be making. Compare similar types of measurements and understand the difference between optimized and unoptimized scan times. A live demonstration is the best way to be sure that a system can meet your full range of metrology needs.
In short, you have to make sure you’re considering the time budget for the full range of tasks from start to finish of a measurement. Scanning speed may be comparable, but what about setup steps, programming, positioning of the part for scanning, and data collection? How often is recalibration required and how quickly is that done?
Ease of Use
Ease of use can be a big factor in selecting both systems and sensors. It impacts training requirements, the number of employees who can use the system, and the likelihood of errors. That makes it a big selling point, but also one that can be misleading. One example is the claim that a provider’s one sensor can do the work of many. Sounds appealing if it’s true, but it can mask the fact that instead of changing sensors, the user has to change the styli that the sensor uses for different jobs. Then there’s the question of how effective a single multi-function sensor can be.
There are lessons to be learned from the multi-purpose Amphicar. Introduced in the 1960s by a German manufacturer, it was once described as “the classiest of all amphibious vehicles,” and was widely considered to be the best car-boat ever made. The problem was, it wasn’t a very good car. And it wasn’t a very good boat. For similar reasons, most of us don’t wear a lot of one-size-fits-all garments or replace our workshops tools with a few multi-purpose tools from the drug store. (If you’re in a hurry and don’t have a power drill with a Philips-head bit, you actually can drive ordinary screws into wood with a hammer, but it tends to mess up the threads and reduce their holding power.)
Specialized sensors increase flexibility, simplify configuration, and improve accuracy. Whether you choose a system with one sensor, six, or some other number, be sure to compare performance in your specific applications. Make sure that uncertainty figures—those defining the repeatability of measurements—include both sensor uncertainty and CMM uncertainty. Ideally, look for compliance with the ISO 10360 standard. And when figuring operating times, be sure to figure in the time needed for stylus changes—up to half an hour in some cases—and setup to perform a new function.
Not Just Hardware
Software has a huge impact on ease of use. It’s the user’s connection to the system. Evaluate its ease of use, the learning curve, and whether it provides a single interface to all aspects of the system. If sensors or other components require their own software, how much will that increase your overhead and complicate operations. How will that complicate programming and reporting?

The sensor enables measurements with skid and skidless systems.
Cost
This is often a case in which total cost of ownership or TCO will outweigh the cost of the inspection system itself. Clearly, TCO will vary significantly from system to system, making it a complicated calculation; however, even a rough estimate will be helpful. Components themselves will be part of the final total, but even over a relatively short time, labor costs of the operation—design, programming, setup, the actual measurement run, data collection, and reporting—will outweigh equipment costs. Ease of use becomes a cost factor if a system or its software requires a higher, and therefore more costly, skill level in its operators.
Beyond the Claims
There is a practical way to get beyond possibly-misleading claims and make sure you’re getting the right sensors for your applications. Insist on a live demo on the CMMs that you use. Consider the full range of applications that you currently use and those you reasonably expect to use in the foreseeable future. If a vendor demonstrates performance requiring only limited movement, ask yourself whether that’s all you need. Run repeated measurements to check on consistency of measurement. If possible, see how the system performance changes with changes in ambient temperature.
Make sure the demos include the entire process—setup, mounting, calibration, any required movement of the workpiece, and reporting. Make sure you’re demoing operations of some complexity to see the system’s full capabilities. Compare each sensor’s required heating time. If workpieces will be measured from different sides, see how that is done. Make sure you’re comparing optimized performance, where available. Compare the software you’ll have to use with each of the sensors and the associated learning curve.

Easily share measurement results both graphically and in tables.
Make a List
Your wish list of system/sensor capabilities will be unique to your operation, but whatever it is it will inform your research and live demonstrations. The following are examples of items you may want to look for.
- Is the system architecture “future proof” so you can easily add new sensors?
- Is the measurement software “future proof” so you can easily
- add new sensors?
- How many software packages will you need to purchase and learn to carry out your measurements? And is the software both complete and easy to learn by everyone who will be using the equipment?
- System movement creates vibration. How effectively can the system isolate this vibration?
- In measuring surface roughness, can the system provide and support both skidded and skidless sensors?
- Can the sensor pivot 180 degrees in three axes to minimize part repositioning and keep measuring time as short as possible?
- Does the system change sensors or styli under CNC control to accomplish different measurement tasks?
- What triggers a recalibration, and how long does the process take?
- Whether you are changing sensors or styli, is that a manual process or can you program it? How long does it take?
- In calculating measurement speed, are you including both motion of the sensor and motion of the CMM? This will vary depending on the complexity of the part.
- Can measurement software be optimized, and if so how does that affect measurement speed?
- How is the system affected by ambient temperature? Will you have to spend more money to tightly control lab or work floor conditions?
- Can the system deliver summarized measurement results in both graphical and tabular form?
- How integrated are sensors with the underlying system?
- How many vendors will be involved in installing, maintaining, diagnosing, and repairing the equipment? This is particularly critical when the unexpected interrupts operations.
- How readily available is service where the system will be used? Q
Looking for a reprint of this article?
From high-res PDFs to custom plaques, order your copy today!


