How to Choose a Vision Lighting Technique
5 common vision lighting techniques and 5 critical questions to ask.

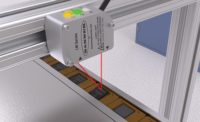
Bar lights enable reliable inspection of electronic components.
The demand for machine vision has grown exponentially as manufacturing facilities turn to automated quality control solutions to remain competitive in fast-paced markets with decreasing tolerance for error. In fact, the rise of machine vision is directly correlated with the increase in automation and robotic use in factories.
While machine vision is critical to the future of automated quality control, it is not without its challenges. Vision applications are complex, and ambient conditions can reduce vision system reliability unless appropriate steps are taken to reduce their impact.
Lighting, in particular, is one of the most important considerations for any vision system—and proper lighting can be the difference between the success and failure of an application. For example, the right lighting technique and light wavelength will accentuate features on an object to create the contrast needed for reliable quality inspection. However, the wrong lighting technique or wavelength can produce a poorly defined, low-contrast image where glare, hot spots, or shadows can obscure important features.
It can be tempting to look for ways to save costs when implementing a large scale, expensive vision system; however, lighting is not the place to cut corners. Even top-of-the-line cameras will produce inconsistent results without appropriate lighting. This is because better lighting produces higher quality images, which are easier for any vision system to analyze effectively and consistently.
The following article describes the importance of dedicated vision lighting, five common vision lighting techniques, how to choose the right wavelength of light, and five critical factors to evaluate when choosing a lighting solution for your vision application.
Why Dedicated Vision Lighting?
Ambient lighting from overhead fixtures or nearby task lights is typically insufficient to properly illuminate targets for a machine vision system. For one, these lights are not bright enough or close enough to the application to provide the focused light necessary to precisely control contrast and produce a consistently high-quality image.
In addition, ambient lighting changes throughout the day. For example, the sun may be shining through the window in the morning but not in the afternoon, or a light from a neighboring machine may be sometimes on and sometimes off. These variables present a different environment depending on the time of day, which can negatively impact the consistency of inspection results.
To optimize image quality, a dedicated light source should be used in any vision application. Dedicated lighting:
- Optimizes contrast between the target object or feature and its background,
- Provides uniform lighting conditions that allow image capture to be unaffected by ambient lighting in the factory environment, and
- Simplifies image analysis by creating high contrast between the “good” and the “bad” feature of interest
The right lighting technique, however, can vary greatly depending on the application and factors like the target’s optical properties (including shape, reflectivity, translucence, and texture), target size and distance from the camera, the features being inspected, the level of detail required, and more.
5 Common Vision Lighting Techniques
Vision lighting technique describes how a light is physically positioned relative to the target. There are five common vision lighting techniques: ring lighting, backlighting, directional lighting (bright-field and dark-field), low-angle ring lighting, and on-axis lighting.
1. Ring Lighting
Ring Lighting
Ring lighting is the tried-and-true standard in vision lighting, used most often in general vision inspections. Standard ring lights mount directly to the camera or vision sensor and both parts can be mounted as one piece for convenience. Ring lights brightly illuminate the area directly in front of the camera and are especially useful for inspecting small parts.
2. Backlighting
Backlighting
With backlighting, the light source—normally a specialized backlight that provides even, high intensity light—is positioned behind the object and shines directly into the camera. Backlighting is the highest contrast lighting technique available, producing a binary image that is easy to process.
For opaque objects, backlighting creates an image that shows a dark shadow of the part (a silhouette). The silhouette can then be inspected for proper size and shape. The high contrast images created using a backlight are ideal for high accuracy applications like precision measurement, gaging small parts, detecting presence/absence of holes, and verifying part placement and orientation.
For translucent objects, backlighting is a common technique when looking for defects or detecting degree of translucency. Backlighting is not a suitable technique for detecting surface color or texture.
3. Directional Lighting
Area Lighting
Directional lighting creates shadows to detect changes in depth, illuminate specific surface angles, and avoid glare of reflective surfaces when directed at an angle away from lens. Directional lighting can be either bright-field or dark-field.
In bright-field directional lighting, the light source is positioned so that it shines more or less perpendicular to the object, making the object appear bright. The features on the object’s surface are visible but not highly contrasted. However, bright-field lighting can produce glare and hotspots on highly reflective surfaces and may not be able to show surface texture.
In dark-field directional lighting, the light source is positioned at a low angle, so that its light reflects off the object, away from the camera. Dark-field lighting results in a darker overall image, but surface defects, raised features, and textures appear bright and stand out from the rest of the target. Dark-field lighting reduces glare, making it ideal for inspecting shiny objects, and this technique can also be used to measure height changes by creating shadows that can easily be measured.
Area lights, spotlights, and bar lights are common light sources that provide directional lighting. Area lights and spotlights provide even illumination in a concentrated area and can be mounted within your existing inspection, independent of the vision sensor’s optical axis. Users can change the direction or distance of the light for improved optical contrast without adding fixtures or realigning the inspected parts.
Meanwhile, bar lights, also known as linear array lights, offer higher intensity lighting to illuminate large areas, while cutting through dust, mist, and grime. Bar lights provide clean, bright, and even illumination to create the optical contrast necessary for reliable accurate inspections of larger objects at longer distances.
4. Low Angle Ring Lighting
Low Angle Ring Lighting
A form of dark-field lighting, a low angle ring light has its LEDs mounted in a ring, pointing toward the part almost perpendicular to the camera’s direction of view. Low angle ring lights create shadows and bright spots to detect changes in depth and surface texture. Low-angle ring lighting is ideal for inspecting surface defects, etching, and embossed marks.
5. On-Axis Lighting
On-Axis Lighting
A form of bright-field lighting, an on-axis light uses a beam splitter to focus light along the camera’s optical axis, providing direct and diffuse light that renders reflective surfaces bright without glare. The camera looks down from the top, through the on-axis light, to the target part below.
This technique can be used to eliminate shadows, inspect shiny object, or detect surface texture differences. The on-axis light and the low angle light produce opposite images in terms of which features appear dark and bright.
Choosing the Right Wavelength of Light
In addition to choosing the right lighting technique, different wavelengths of light can also be used to create additional contrast, draw out features of interest, or reduce the visibility of insignificant features.
Colors of Light
Different colors of light can be used to create additional contrast to either obscure or draw out specific features. In general, when a light source is a similar color to the part, it will make the part appear brighter. For example, a red part illuminated with a red ring light will make the red part look bright on the image.
Conversely, when a light source color is different from the color of the part, the part will appear darker. An example is when the same red part is illuminated by a green light, the red part will appear dark.
Ultraviolet (UV) Light
Ultraviolet (UV) light can be used to draw out features of interest when there is very little contrast from the background, such as beads of clear adhesive on a part. Shining UV light on the adhesive may create a glowing effect (fluorescence) that makes the adhesive stand out clearly from the background. This makes it easier for the vision system to reliably identify when adhesive is missing or applied incorrectly.
Infrared (IR) Light
Infrared (IR) light can be used to hide insignificant features by reducing the contrast of certain objects. For example, some types of ink that appear dark in the visible spectrum reflect large amounts of IR light. In these cases, ink may disappear in a grayscale image—an effect that can be used to hide certain insignificant features. IR light can also be used to reduce glare and reflections when inspecting shiny objects.
Get Started with Vision Lighting: 5 Questions to Ask
Now that you understand the most common vision lighting techniques, it is important to understand how these apply to your specific application. When choosing a vision lighting solution, the first step is to thoroughly evaluate your application requirements. The following are five key questions to help you identify the right lighting technique and wavelength for your application:
What are the optical properties of the target?
Understand your target and how the camera sees it. For example, is the target highly reflective? Under bright-field lighting, very shiny objects will reflect most of the light back to the camera, creating glare and making the image difficult to process accurately. Meanwhile, dark-field lighting is a form of indirect lighting that reduces glare when inspecting reflective targets.
What are you looking for?
Articulate exactly what the camera needs to see. Inspecting an object for surface imperfections will require a different lighting technique than inspecting an object to verify the presence/absence of specific features.
What size is the target?
What size are the features being detected/measured? Clarify both the size of the target and the size of the features being inspected. For example, ring lighting and backlighting are both common techniques for inspecting small parts. However, when inspecting surface texture or small raised features, dark-field directional lighting is often a better choice.
How far away is the target?
What are the mounting constraints? Know the space you are working with and what mounting options are available. For example, in applications where mounting options are limited, a ring light that attaches directly to the camera means that there is only one device to be mounted. On the other hand, large targets may require larger lights mounted farther away to properly illuminate the entire surface.
What is the speed of the application?
Know how fast your target will be travelling when inspections are in progress. The actual speed of the application can significantly impact inspection results compared to tests on slow-moving or stationary targets. For example, a stationary target might be easy for a camera to capture; however, the same target in the same environment moving at high speeds can result in a blurred image. The right lighting technique can reduce the impact of application speed to produce a better image that is easier for the camera to process accurately. In general, brighter, more powerful lighting is often necessary for high-speed applications.
After answering these questions, the next step is to test out a solution. Every vision application is unique, and it is best to try the solution in real-world conditions to make sure it works for your application. V&S
Looking for a reprint of this article?
From high-res PDFs to custom plaques, order your copy today!


