Test & Inspection
Is it Possible to Measure Shaft, Form and Gear with an All-In-One Machine?
Do more with less — minimizing downtime for production workpiece measurements.

Source: Mahr
As important as it is to get highly accurate, reliable workpiece measurements to ensure perfect conformance with even the tightest specifications, any task that isn’t directly generating output on a production run can be a drain on productivity. It’s a bit of a Catch-22.
Every production manager knows the balancing act. Manufacturing efficiency and quality assurance – yin and yang – are always pressured to meet more and more demanding targets. Output and quality must be optimized. That often means finding ways to do both at the same time, such as bringing quality control to the shop floor to conduct in-line testing and adjust on the fly, as needed.
Ever-increasing accuracy requirements and declining cycle times are also creating the need for rapid, precise measurement directly in the production environment. Operators are looking to incorporate more of the necessary part measurements at the point of manufacture to reduce downtime and allow more efficient adjustments, as repeat testing can be conducted right then and there until a satisfactory result is obtained. It eliminates the time and delays involved in running a batch of samples, taking them to the lab for testing, bringing results back to the floor, making more adjustments and starting over again…over and over again, until the measurements are just right. Even if the lab is nearby, the interruption adds unnecessary movement, handling and potential waste – which totally goes against the principles of lean manufacturing.
Advancing quality and performance expectations of finished products demands increasingly precise manufacturing to tighter tolerances. However, economics also demand maximal throughput, and it is becoming more important to measure workpiece characteristics like surface finish, 3D shaft and bore dimensions and more directly at the point of manufacture. Production engineers are reconfiguring to conduct as much of the required quality testing in-line as possible to conserve time, labor and productivity. These dual needs are driving growth in the use of integrated systems that incorporate multiple functions and prioritize efficient processing with high accuracy.
But how much quality testing can be conducted without interrupting production? Several different dimensional measurements are likely needed, such as shaft, gear and form. Dedicated machines exist for each of these characteristics. CMMs have also been used for decades to perform many of these measurements in the lab; they’re versatile machines, a sort of jack-of-all-trades in the quality world. However, while CMMs can measure a good variety of dimensional characteristics relatively well, they may not be able to do so with the highest level of precision needed for complex pieces such as gears.

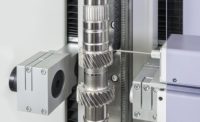
Calibration of optical measuring system on a shaft machine. Source: Mahr
How To Conduct Shaft, Form And Gear Measurement On A Single Machine
Here’s a thought: what if you could also perform multiple measuring tasks at the same time, on the same part with one machine, right there on the factory floor? Could both quality and output be even better optimized by consolidating metrology functions?
Take for example, a machine that will test shaft, form and gear dimensions all at once, and is designed to fit right beside the production line. Fundamentally, all three classes of machines have the same or a similar type of rotational axis typically used to measure all three of these workpiece characteristics. So why not build a machine that does it all?
Similar to an “All-In-One” printer/scanner/copier in a home office, a new class of production line quality machines is emerging that is designed to serve multiple functions without sacrificing quality. Using multi-sensor technology, the machine can obtain extremely accurate optical and tactile measurements for rotationally symmetrical workpieces in one setup. This multifunctional capability enables extreme flexibility in workpiece size and significantly increases productivity in the manufacturing environment.
This class of system is designed to solve different measuring tasks as quickly as possible, close to production and in one system. It includes up to four CNC axes, optical and optional tactile sensors, and sophisticated monitoring systems to acquire 3D measured values reliably and precisely. High-resolution matrix array, or CCD cameras, ensure stable, precise and accurate measurements. This type of new production line quality machine is designed for maximum ease of use and includes a motorized tailstock with clamping force monitoring for fast alignment without operator influence and an intuitive user interface with proven software programs.
The result is a completely new concept that combines the best of the production metrology worlds. Users benefit from state-of-the-art flexibility, productivity, process reliability and ergonomics with robust features that include integrated vibration installation and real time temperature compensation for use in the operating environment, and they are able to select from different machine variants to have the one that optimally fits individual measuring requirements. Ergonomics and safety enhancements include fast loading, and interior monitoring for the protection of the machine.
This one solution can fit multiple tasks rather than having to buy separate machines—and enables hundreds or thousands of parts to be measured per day, not just the handful of parts that can be measured in an average day in a lab. And, unlike traditional CMMs that were designed to be so flexible that accuracy and precision are sacrificed in some cases, new all-in-one production line quality machines do not force the user to compromise for a broad set of applications, just not as broad as a CMM might.
The means no more shuffling parts between the shop floor and the lab (and sometimes even between buildings) or among different machines in the production environment. This new class of production line quality machine is right there on the shop floor next to other manufacturing machines. Ultimately, this results in quality, reliable measurements with less training, less cost, and less space on the shop floor, with a substantial ROI gained from purchasing just one precision measurement machine rather than two or three.
Conclusion
Today’s manufacturing environment demands increased efficiency and quality. As industry advances, so too does the need for extreme manufacturing precision; highly accurate measuring systems are needed to ensure the tightest tolerances are met—with increasing efficiency to keep costs down without compromising quality at all. Consolidating processes, including parts measurement, can provide substantial improvements.
That often means finding ways to do multiple processes at the same time, such as bringing quality control to the shop floor to conduct in-line testing. A new class of production line quality machines is emerging that is designed to serve multiple functions including the measurement of shaft, form and gears in one precision measurement machine. This type of machine can obtain extremely accurate optical and tactical measurements for rotationally symmetrical workpieces in one setup. This multifunctional capability significantly increases productivity in the manufacturing environment.
Looking for a reprint of this article?
From high-res PDFs to custom plaques, order your copy today!


