Test & Inspection
Compression Testing Fundamentals
Compression testing can be a critical diagnostic tool in all phases of the product development cycle, from prototyping through production.

Compression testing is a fundamental method in materials science and engineering used to determine the behavior of materials under compressive loads. It is essential for determining the mechanical properties of materials, such as stiffness, strength, and fatigue life. This article provides a comprehensive overview of compression testing, including the testing process, relevant material properties, industry standards, interesting applications, common challenges, and best practices to address them.
Basics of Compression Testing
Compression testing involves subjecting a material specimen or product to a controlled compressive force until it deforms or fails. The test can be either force- or strain-controlled and can follow either a constant ramp, a fixed waveform, or a random waveform. The setup and execution of the test is often specified by the American Society of Testing and Materials (ASTM) or International Standards Organization (ISO). However, many product tests are conducted according to the manufacturer’s own in-house test specifications. Most compressive material properties are determined by performing quasi-static tests usually under a slow constant ramp at a fixed strain rate. Durability tests that measure the fatigue life of a material or product at different force or stress levels tend to be dynamic tests conducted at 5 to 20Hz under sinewave cyclic waveforms. Random dynamic compressive waveforms are also employed to simulate real-world conditions, such as a bicycle wheel rolling over uneven terrain. The following steps outline the basics for conducting a compression test. Before performing tests, users should first become familiar with the testing standard (ie. ASTM or ISO) to ensure that tests are being conducted properly.
- Specimen Preparation: Specimens are prepared according to the dimensions outlined in the test standard. Specimen geometries, such as cylinders, cubes, or prisms are commonly specified. To ensure uniform load distribution, specimen surfaces should be smooth and parallel.
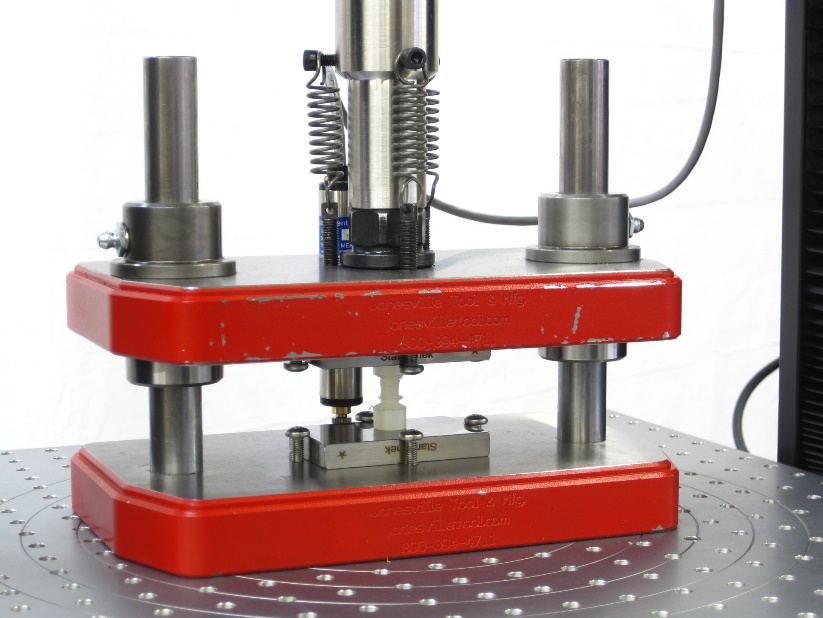
- Testing Machine Setup: Universal Testing Machines or compression only machines should be configured with fixturing compliant with the relevant ASTM or ISO test standard. Compression platens with hardness and smoothness requirements are commonly used to apply compressive forces. Both platens may be fixed in plane or one may be allowed to rotate out of plane to accommodate out of plane deformations or non-uniform, non-parallel surfaces.
- Loading: Compressive forces are applied through the loading platens. A force transducer or load cell on the testing machine records the applied load/stress. Specimen deformations are either measured with the testing machine crosshead position sensor or with a strain measuring device which is usually fixed to the specimen or compression platens. Non-contacting strain measuring devices are also used. The crosshead position sensor is most often employed when large deformations are measured. If small strain readings are required, then a non-contacting strain measuring device or a sensor fixed to the specimen or compression platens is required. To be compliant with a specific testing standard, the force and strain measuring transducers need to be calibrated and certified for accuracy according to ASTM or ISO testing standards.
- Data Collection: During the test the load-strain data is recorded. In modern testing systems data is recorded digitally, displayed real-time on a computer screen and stored in memory so that computer programs with specific algorithms can scan the data and calculate the desired mechanical properties. The recorded data is also written to file so it can be recalled at a later date. Data log rates for quasi-static tests generally range from 5 to 50 samples per second. For fatigue life tests, log rates at 1,000 samples per second or higher may be required.
- Analysis: The load-strain data collected during a test is used to generate a stress vs strain curve as shown in Figures 1 and 2. Figure 1 depicts a stress vs strain curve for a material exhibiting a linear elastic response up to its proportional limit (pt A) whereas Figure 2 depicts a material with non-linear behavior up to its elastic limit (pt E). The stress-strain curve is analyzed to determine key mechanical properties, which are discussed in this article’s next section.

Figure 1 – Stress vs Strain curve for a material exhibiting a linear elastic (Hookean) region up to the proportional limit. Source: ADMET

Figure 2 – Stress vs Strain curve for a material exhibiting non-linear behavior prior to the elastic limit. Source: ADMET
Key Material Properties Found in Compression
Compression testing provides critical data on the mechanical properties of materials in compression. Key properties of interest include:
Compressive Strength – A material that fails in compression by crushing or fracturing, the compressive strength is the maximum stress (Figure 1 pt D) at or before fracture as determined by dividing the maximum force by the original cross sectional area. Note that specimens that are too slender may buckle instead of crush or fracture and should not be used to determine compressive strength.
Compressive Offset Yield Strength – On the stress vs. strain diagram in Figure 1, lay off O-X equal to the specified value of the offset then draw line X-B parallel to O-A and record the intersection point B on the stress vs strain curve. The stress at point B is the Offset Yield Strength and should always be reported with percent offset included. By definition the material does not have a yield strength if the force decreases before the specified offset is reached. In this case, the stress at the maximum force before the specified offset is reached may be reported as the upper yield strength.
Elastic Limit – The greatest stress a material can sustain without any permanent deformation after removal of all stresses (Figure 2 pt E).
Proportional Limit – The greatest stress (Figure 1 pt A) that a material can sustain without deviation from proportionality (straight line) of stress to strain (Hooke’s Law)
Modulus of Elasticity – The ratio of stress to strain below the proportional limit. The material’s stiffness, calculated from the initial linear portion of the stress-strain curve. The slope of line OA in Figure 1 is the Modulus of Elasticity. Secant Modulus is reported instead of Modulus of Elasticity for materials with a non-linear elastic region.
Secant Modulus – The slope of line O-F between the apparent zero (Figure 2 pt O) and any stress point (Figure 2 pt F) on the stress vs strain curve below the elastic limit. Note that Modulus of Elasticity is the preferred value whenever possible.
Axial Strain – The change in the original length divided by the original length. If an extensometer/compressometer is used then the original length is the gage length of the compressometer.
Fatigue Life – the number of cycles that a specimen or assembly can sustain at a particular load or stress before functional failure occurs. As an example, fatigue life is a parameter of interest in medical implants (hip, knee or spinal implant) and here functional failure is defined as the point where the assembly becomes ineffective.
Examples of ASTM and ISO Standards that Require Compression Testing
Standardization of procedures is critical to ensuring consistency, accuracy, and scientific validity of compression tests. In practice, many aspects of materials testing, such as specimen preparation, machine set-up, and loading, are all governed by industry- and application-specific American Society for Testing and Materials (ASTM) and International Standards Organization (ISO) test standards. A few example standards encountered in our materials testing business are included in Table 1 below. This list is not exhaustive; in fact, at the time of writing, there are nearly 30,000 test standards published by ASTM and ISO alone, and many more when including other organizations.
Table 1 – Example ASTM and ISO Test Standards that require compression testing.
|
# |
Test Standard |
Specimen Type |
Material Property of Interest |
|
1 |
ASTM D695 Plastics Figure 3 |
High-modulus composites and plastics (modulus < 41,370 MPa) |
Yield strength, compressive strength, Modulus of Elasticity |
|
2 |
ASTM C39 Concrete |
Cylindrical concrete cores
|
Compressive strength |
|
3 |
ASTM C469 Concrete Figure 4 |
Cylindrical concrete cores
|
Modulus of Elasticity, Poisson’s ratio |
|
4 |
ASTM F1717 Med. Implants |
Lumbar and cervical spinal implant constructs |
Yield Strength, Compressive Strength, Stiffness, Fatigue Life |
|
5 |
ASTM F2077 Med. Implants Figure 5 |
Intervertebral body fusion device, plus two vertebral test blocks |
Yield Strength, Compressive Strength, Stiffness, Fatigue Life |
|
6 |
ASTM D3574 Foams Figure 6 |
Flexible polyurethane foams (volume > 10,000 mm³) |
Indentation Force, Compressive Set, Dynamic Fatigue by Constant Force Pound, Recovery Time, Hysteresis Loss |
|
7 |
ISO 14801 Dental Implants Fig 7 |
Single post endosseous dental implants of the transmucosal type (length > 8 mm) |
Fatigue life at a range of angles |


Figure 3 – Yield strength and modulus testing of a rigid composite (ASTM D695). Compression tool is configured with hardened platens and uses a displacement sensor between platens to measure strain. Source: ADMET

Figure 4 – Determining the Modulus of Elasticity of Concrete Cylinders according to ASTM C469. Strain is measured with a compressometer that is fixed to the sample. Upper compression platen includes a spherical seat. Source: ADMET


Figure 5 – Testing intervertebral body fusion device assemblies according to ASTM D2077. Source: ADMET

Figure 6 – ASTM D3574 Foam Testing System configured with compression platen that can swivel out of plane. The ASTM D3574 test specification has many sections. Common tests D3574 tests that can be performed with this setup include Test B1 - Indentation Force Deflection Test—Specified Deflection (IFD), Test C—Compression Force Deflection Test. Test M – Recovery Time, Test N – Hysteresis Loss. Source: ADMET

Figure 7 – Determining the Fatigue Life of endosseous dental implants according to ISO14801. The test fixture includes a compression probe with spherical seat and a heated fluid bath that is saline compatible. Source: ADMET
Interesting Applications
Compression testing has important applications across a wide range of industries, including automotive, aerospace, defense, construction, medical devices, electronics, plastics, packaging, and many more. Additionally, compression testing can be a critical diagnostic tool in all phases of the product development cycle, from prototyping through production.
In the following list, three short examples and their pictures illustrate the breadth of real-world applications supported by our company in compression testing today:
- Mattresses of any size are cyclically loaded to measure their firmness retention and surface dimpling according to ASTM F1566 Section 9.
- Tennis balls are compressed with both constant and cyclical forces of 18 pounds to measure deformation and rebound characteristics, per International Tennis Federation (ITF) standard
- Large compression springs used in offshore oil drilling are cyclically loaded to 70,000 pounds for 100 cycles in 30 minutes. Before the first cycle and after the 100th cycle, the free height of the spring and force at specific deflections are measured.

Figure 8 – ASTM F1566 Section 9 (Cornell Test) Firmness Retention and Surface Deformation test features a dynamic test system capable of 100 cycles per minute to 1025N for 100,000 cycles. Test specification requires machine to stop cycling at fixed intervals and record force every 12.7mm increments to 1025N to measure the cumulative affect the cycles have on the firmness and free height of the mattress. The compression platen for this this test mimics a human buttocks. Source: ADMET
Figure 9 – Compressive testing of tennis balls; must withstand 18 pounds for ITF conformance. Source: ADMET

Figure 10 – Compressive testing of large metal spring used in deep-water offshore oil drilling. Source: ADMET
Common Challenges and Best Practices to Address Them
Compression testing, while straightforward in principle, presents several challenges that can affect the accuracy and reliability of results. Here are some common challenges and best practices to address them:
|
# |
Category |
Challenge |
Best Practice |
|
1 |
Specimen Preparation |
Inconsistent specimen preparation can lead to non-uniform stress distribution and inaccurate results. |
Ensure that specimens are prepared with smooth, parallel surfaces and standardized dimensions. Use precise cutting and machining techniques to achieve uniformity. |
|
2 |
Machine Calibration |
Incorrect calibration of the testing machine can result in erroneous data. |
Regularly calibrate the testing machine according to manufacturer guidelines. Use certified calibration standards to verify the accuracy of load and displacement measurements. |
|
3 |
Data Analysis |
Variability in data analysis methods can lead to inconsistent results across different studies. |
Standardize data analysis procedures, including the calculation of stress and strain, and the interpretation of the stress-strain curve. Use consistent criteria for determining key mechanical properties. |
|
4 |
Specimen Alignment |
Misalignment of the specimen in the testing machine can cause uneven loading and premature failure. |
Carefully align the specimen between the platens of the testing machine. Use alignment fixtures or guides to ensure proper positioning. |
|
5 |
Environmental Conditions
|
Environmental factors such as temperature and humidity can affect the material's behavior during testing. |
Conduct tests in a controlled environment with consistent temperature and humidity levels. Record environmental conditions during testing to account for their potential impact on results. |
|
6 |
Repeatability |
Achieving repeatable and reproducible results can be difficult due to variations in testing procedures and equipment. |
Follow standardized testing protocols and guidelines, such as those provided by ASTM or ISO. Conduct multiple tests and use statistical analysis to assess the repeatability and reproducibility of results. |
|
7 |
Specimen Storage |
Improper storage of specimens can alter their mechanical properties. |
Store specimens in conditions that preserve their original properties. For biological specimens, use appropriate preservation techniques to prevent degradation. |
Conclusion
Compression testing is a vital technique in materials science and engineering, providing essential data on the mechanical properties of materials under compressive loads. It has wide-ranging applications in construction, biomedical engineering, packaging, aerospace, and automotive industries. Despite its simplicity, compression testing presents several challenges that can affect the accuracy and reliability of results. By following best practices in specimen preparation, machine calibration, data analysis, and environmental control, researchers and engineers can overcome these challenges and achieve consistent, reliable results.
Looking for a reprint of this article?
From high-res PDFs to custom plaques, order your copy today!


