Measurement
Trends in Multi-sensor Measurement
Tactile and optical measurement techniques each have their advantages. Multisensor systems combine the strengths of both.


Good. Fast. Cheap. Choose two.
— The Designer’s Triangle, author unknown
This well-known adage doesn’t just apply to the design of systems; it also applies to the systems themselves. In systems designed for automated precision measurement, users are typically balancing accuracy of measurement, speed of operation, and cost to purchase and operate. The need for tradeoffs and sometimes-difficult choices will always be with us, but the introduction of multisensory measurement over the last several decades, along with subsequent improvement in its capabilities, offers opportunities for improvement in all three areas. The key to maximizing performance lies in understanding the available capabilities and choosing those that will deliver meaningful benefits in your specific applications.
Why Multisensor?
Tactile and optical measurement techniques each have their strengths, and there are certainly measurement tasks that require only one of the two. But in many cases, because the two methods complement one another, the combination can yield better data than either alone. In some specialized cases a third technology, either laser or “white light,” can be added. And while separate machines are certainly an option, a multifunction machine eliminates the need to move test pieces, speeding up the process and reducing labor cost. A multifunction machine can cost less than multiple single-purpose machines and reduces “real estate” costs. And, depending on the recurring demands of the operation, multisensor and single-function machines can be deployed side-by-side, allowing you to choose the most efficient and cost-effective functionality for each task.
Complementary Strengths
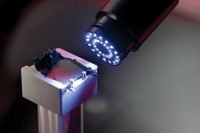
Optical measurement can collect a large amount of data very quickly and can address parts or features that are too small or too fragile for practical tactile measurement. But like a photograph, visual measurement flattens what it sees into two dimensions, so while it is very good at measuring two axes, typically X and Y, to identify outside edges or edges where two surfaces meet, it is not suited for measuring smooth contours along a third, usually the Z axis. And while it can see down into holes, it is limited to line-of-sight.
Tactile measurement can handle all three dimensions including smooth curves in the Z axis and is not limited to line-of-sight. It can reach down into holes and along walls and come at vertical surfaces sideways to gather data that visual methods cannot, but it may be limited by the physical reach of measuring tips. The amount of data collected depends on the contact method used. Touch-trigger systems make contact, withdraw, move and repeat, collecting one data point at a time. Scanning systems slide across the surface collecting hundreds or thousands of data points as they move, and are both faster and more thorough.
Multisensor systems combine the strengths of both technologies. Examining a computer mouse, for example, a camera could quickly gather data regarding the edges while a scanning tactile sensor collects data on the curved upper surface.
Optimizing Visual Measurement
While many consider multisensor measurement a mature market, there are still details and capabilities that can significantly impact its effectiveness, its suitability for any particular application, and the user’s return on investment. For example, it is widely believed that “if you can’t touch it you can’t really trust the data.” While this has some basis in fact, there are visual technologies that are every bit as accurate as contact measurement (in addition to delivering visual’s particular advantages in certain applications). For example, magnification is a key factor contributing to the accuracy of visual measurements and can greatly improve an optical system’s accuracy. Unless you know exactly what you are going to measure, both now and in the future, you will want a wide range of readily adjustable magnifications. A wider field of view lets you quickly cover a larger area, while a higher magnification lets you address small parts or finer features with greater accuracy. Higher magnification can also narrow depth of field to eliminate irrelevant details.
Another key factor in the accuracy of visual measurement is the angle at which the system views the feature being measured. Ordinary lenses collect images from a conical area in front of the lens. This creates a true image of only what is in the center of the field of view; anything not in the center is viewed at an angle and, therefore, distorted. Telecentric lenses view everything in their field of view “head on” and without distortion, greatly improving accuracy.
Features can tell you a lot about a system’s capabilities, but the best way to determine the real accuracy of a visual technology is GR&R (gage repeatability and reproducibility), the comparison, preferably in a live demonstration, of repeated measurements. That will tell you how accurate the system is at the demo site, but realizing that same accuracy in your own installation depends on one more step: the qualification of a system and certification of equipment during your installation. For maximum accuracy, a system should be qualified in true 3-D using a step gage. And at installation, the system must be calibrated to ensure that it is performing to its full potential. In this process, the accuracy of visual sensing can be adjusted to match that of the system’s contact sensing.
Optimizing Contact Measurement
First, unless your measurement needs are minimal, continuous scanning measurement delivers far more data far faster than a touch-trigger measurement, enhancing both accuracy and speed. Second, unless all the materials you plan to measure will be rigid, the scanning technology for applying the probe to the material will matter. Some technologies apply enough pressure to actually deform soft or thin-walled materials, producing unusable measurements. A better choice is electronic displacement technology, which exerts far less force—measurable in millinewtons—that will not distort flexible materials. Also, you might want to check if there is a required warm-up time for some tactile sensors.
Laser and White Light
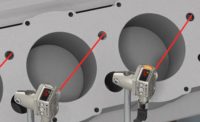
Laser and white light technologies fill a small gap between optical and contact methods. This is typically in areas that are too small for contact measurement and where standard optical means cannot measure surface contour. Laser’s small spot size can measure areas and features that are too small for tactile sensors to reach and, unlike ordinary light, laser’s reflection can be captured to measure distance to a surface providing measurements in the same axis.
Like laser, white light technology sensing can be used to measure 3-D surfaces both quickly and accurately. A white light system focuses a light source on an area of the target surface as small as 12 microns, collects the back scatter, and analyzes spectral response to determine the distance to the surface. In addition to being fast and accurate, the technology can measure the contours of difficult surfaces including those that are highly reflective, highly light-absorbent, or transparent.
Pallets and Fixturing
Moving test parts onto and off of measuring systems can be either quick and easy or painstaking and time-consuming, impacting the efficiency of the entire operation. Consider mounting and pallet technology and the time and effort required for alignment and calibration. As with other features, this can often be best determined through demonstration.
Software: Putting it all Together
Because software manages the entire measurement process and serves as the operator interface, it is critical to the efficiency of a multisensor system. Ideally a single software package should manage both contact and optical measurement, along with laser or white light if either is utilized in a multisensor machine. In some cases, the same software that supports multisensor equipment can also serve other measurement systems in the same facility to simplify work for operators.
If the software is specifically designed to interface with 3-D CAD, you will be able to import 3-D CAD models and use them to set up the measurement process, eliminating costly, time-consuming manual programming. And after measurements have been made, an interface with 3-D CAD can also allow visual presentation of the actual measured dimensions overlaid onto the original CAD model, visually highlighting variance and tolerances.
Multisensor systems can improve the efficiency and reduce the cost of measurement operations, but careful attention to details of system operations can help maximize return on your investment. A clear understanding of your current needs will help with evaluation of capabilities, but it may also be wise to consider likely future needs, as after-purchase upgrades can be far more costly than including features in the initial purchase. The end result will be quicker, more affordable measurement and improved quality and conformity of your end product.
TECH TIPS
Tactile and optical measurement techniques each have their strengths, and there are certainly measurement tasks that require only one of the two.
But in many cases, because the two methods complement one another, the combination can yield better data than either alone.
In some specialized cases a third technology, either laser or “white light,” can be added.
Looking for a reprint of this article?
From high-res PDFs to custom plaques, order your copy today!


