Quality 101
Ins and Outs of Height Gages
Know your height gages for efficient and accurate measurements.


Tools in this group have increased accuracy, and may have additional features including tolerance setting, ID/OD measurement, max/min, TIR and probe compensation. Source: Mitutoyo

Digital counter height gages with dial and dual-digit counters decrease the time necessary to measure a part.
Source: Mitutoyo

An advantage of Vernier height gages is the available range of sizes, generally from six inches to six feet. Source: Mitutoyo

The relatively small size of dial height gages makes them ideal as a personal height gage that can be stored in a toolbox.
Source: Mitutoyo

Height gages such as these generally have inch/metric conversion, absolute zero and floating zero, as well as data output. Source: Mitutoyo


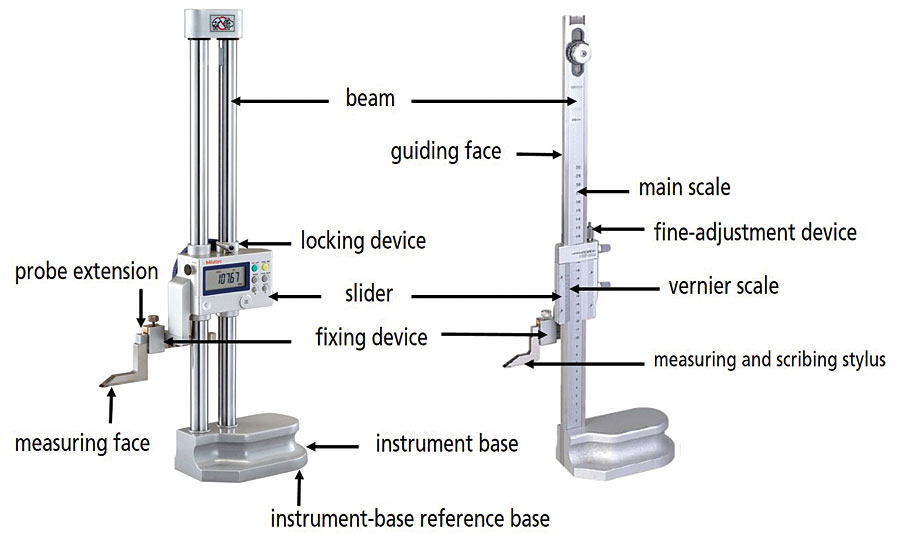
A height gage does exactly as its name indicates—measures the height of a workpiece. A height gage is a measuring instrument in which a slider with a measuring stylus moves relative to a measuring scale on a beam and in which this motion is along a single vertical axis nominally perpendicular to a reference plane on the instrument base.
Height gages are normally used on a granite surface plate to measure and/or scribe part features from a datum plane. Generally a scriber, test indicator, touch probe or CMM-style probe is used to locate the measured feature. Height gages are an indispensable instrument for quality control.
There are several types of mechanical and electronic height gages to choose from, depending on a company’s needs and budget.
Mechanical height gages have been used in flat plate layout for many years. There are three basic types of mechanical height gages:
- Vernier height gages are available from six inches to six feet in height, a chief advantage over other height gages. It can have one or two (both inch and metric) scales on the beam.
- Dial height gages are generally available only in sizes below 12 inches/300 mm. It is easier to read than a Vernier height gage, and the small size makes it ideal as a personal height gage that can be stored in a machinist’s toolbox.
- Digital counter height gages with dial and dual-digit counters decrease the time needed to lay out a part. Not only is the dial easier to read than a Vernier scale, but the dual-digit counters allow one counter to be set at the reference datum and the other to be used as a floating zero.
Electronic height gages can be divided into three distinct groups.
The first group has accuracies similar to mechanical height gages. Generally, they will have inch/metric conversion, absolute zero and floating zero, and data output.
The second group includes all of the first group features, however, the accuracy of the tool is a magnitude of order better and may have additional features, such as tolerance setting, ID/OD measurement, max/min, TIR and probe compensation.
In general, the last group has all the features of the second group and a higher accuracy rating. Most height gages in this class will have air bearings, a motorized touch probe, the ability to generate and store part programs, and a computer interface, allowing for SPC. They also can measure a part feature in two dimensions by rotating the workpiece. Use these height gages when higher accuracies are required, or to help reduce the demand on your CMM.
TAKING MEASUREMENTS
Most height gages are supplied with a scriber, which serves to locate the top of the workpiece. When more accurate measurements are required, a test indicator or LVDT high-accuracy probe can be used. With dial height gages, a scriber or test indicator can be used, while digital gages can be equipped with a scriber or touch probe. The touch probe allows the operator to automatically detect zero, as well as the difference between two distances.
With digital height gages, a touch-probe option allows measurements to be sent to a data collector or indicates that the measurement is complete and a reading can be taken. The touch probe helps eliminate human error.
There are some distinct advantages to using a digital display on the height gage: it is easier to read than a dial indicator, easily switch between units of measurement and resolution, zero set anywhere and the ability to use an electronic data collector.
One measurement conventional height gages with a scriber have difficulty with is distance between centers. This shortcoming was resolved when the height gage with calculation power was introduced. This allows the height gage to memorize the highest and lowest point within a sweep. This height gage is still a 2D gage, but peaks and valleys can be stored and recalled with the push of a button. The ball probe can be interchanged with smaller ones to reach narrow slots. Most height gages with a scriber have been used to measure steps or heights that face upward. Measuring the bottom edge of a slot or groove wasn’t really an option until a ball probe combined with a microprocessor to compensate for the ball diameter, making the process of measuring distances such as center-to-center quicker and easier.
At the same time, a set of gage blocks should be used to validate all dimensions taken by a height gage. With the gage blocks—the most accurate artifact standard—the height gage no longer measures from the bottom to the top. Instead it serves as a transfer stand and compares the unknown part against a known gage block.
BEFORE MEASUREMENT
The presence of gage blocks on a granite plate is required. Make sure that the surface of the granite plates and the bottom of the height gage are kept clean. Poor conditions on the contact surfaces will affect the outcome.
It is recommended that before taking measurements, the gage be flipped on its side so the bottom can be inspected. Use a rubber stone or cera stone to remove burrs, scratches or other deformations. Clean the base with denatured alcohol to remove any residue from the stoning process. The surface plate also should be wiped clean to remove any dust oil or other contaminants that may cause the gage to stick to the plate.
To check that the surfaces mate correctly, mount a test indicator to the scriber and bring the indicator to the surface or reference part. Zero the gage and then gently press down on the corners of the base. If the indicator moves, the surface is not level and should be re-stoned until a smooth surface is obtained.
Similar to the base and granite surface, regular maintenance is necessary for the column(s) of the height gages. Stone and wipe the columns to remove any burrs or scratches. For the rack on the column, use a soft brush to remove any buildup. Failure to do so can result in the pinion moving unevenly, resulting in miscounting of both dial and digital height gages.
Knowing the type of height gage, as well as properly maintaining it, will help ensure efficient and accurate measurements.
Looking for a reprint of this article?
From high-res PDFs to custom plaques, order your copy today!


