The use of computed tomography (CT scanning) for dimensional inspection is rapidly expanding as companies discover how this technology is the best solution for a wide range of dimensional inspection, flaw detection, and assembly verification applications. This technology trumps all other technologies for many applications, as CT scanning provides comprehensive 3-D data sets that can completely characterize a part geometry and capture complete data for both outer and inner surfaces. For reverse engineering and rapid prototyping, the STL mesh from CT scanner 3-D data sets are virtually “water-tight” as scanned, as an X-ray does not have the line of sight issues that other sensors have. This means there are no gaps in the surface mesh that must be filled in with “best guess” post-processing of the data. This saves time and provides a more certifiably accurate model.
All CT scanners can provide brilliant 3-D images, offering insight into hidden features that are difficult or impossible to detect with other methods. But not all CT scanners are created equal, and for certified traceable inspection of part dimensions, a CT scanner that provides a true volumetric accuracy statement with a traceable certification should be used.
Currently the VDI-VDE 2630 specification is the only standardized method for evaluating the baseline performance (measurement uncertainty) of CT machines. It is typically used in combination with ISO 10360. The specification states that the CT manufacturers must use traceable dimensional gages to validate the measuring performance of CT machines. Unfortunately not all CT scanning systems on the market today comply with the standard. It is important to be aware of this if you are considering the purchase of a CT scanning system, or are outsourcing any dimensional inspection that requires certified accurate results.
Ask the CT manufacturer or service provider to show their MPEsd , MPEPF, MPEPS and MPEE values
The most accurate CT scanning systems are built like a CMM with an X-ray probe. These machines are built with high precision components, using modern CMM technology and concepts. Today’s CMMs are constructed with rigid, repeatable machine structures with linear response to thermal variation. These machine structures help reduce random errors, so these machines can be more accurately 3-D error mapped, providing high accuracy while reducing overall machine cost. In addition to modern CMM construction, a CT scanning system should also employ a measurement software with PTB or NIST certified algorithms. If the parts you are manufacturing require certified dimensional inspection, the CMM software should be certified.
If the volume of work you produce that could utilize CT-CMM scanning does not justify the purchase of a machine, CT scanning services are available for dimensional inspection and flaw detection. Some manufacturers have multiple locations across the USA where the systems can be demonstrated, and/or contract services are available. Whoever you contract with, it’s fair to ask the provider what type of systems they are using, and if the work is being done in-house. Be sure to review the application with the service provider, and provide specific details about what your expectation is for the end result. This can help prevent a deliverable that does not meet your requirements. If the requirement is for dimensional inspection, a print with the features of interest highlighted helps clarify the scope of the project. If you have a solid model CAD for the part, this will allow a graphical “part to CAD” inspection report to be generated. A report like this provides a chromatic legend that displays how the part deviates from the nominal CAD data. These reports are very intuitive and allow the results to be more easily understood by a variety of staff and management.
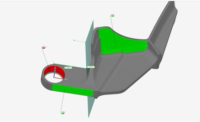
The opening image is of a 3-D chromatic part to CAD inspection report. Note that the deviation from the CAD model is even displayed for the internal threads! The volume of the data set is so complete that it can simulate a functional gage like a thread gage, but even better since quantifiable dimensions are accessible.
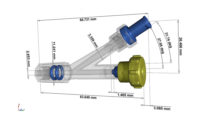
For parts with complex geometries and a multitude of features to be measured, inspection with a CT scanner can dramatically reduce the time to create and execute a part inspection program. This page also shows a 3-D CT image of an electrical connector. The CT scan captured the part geometry in its entirety, on both inner and outer features. No complex CNC program has to be written, and the part fixture can be as simple as a piece of foam cut to hold the part. Taking a measurement of a feature at a specified depth to account for a draft angle is no problem. Inspection points can be taken anywhere on the surface of the features.
Images of the data file can also be sliced at exact locations for evaluation or for creating a 2-D profile plot. These 2-D plots with “whiskers” showing the deviation from nominal in a specific plane are very valuable for some applications. In addition to the graphical display, the feature dimensions can also be shown in text boxes that correspond to specific callouts on the part print.
Newer technologies like rapid prototyping / 3-D printing systems are expanding the possibilities for manufacturing, and can create complex geometries that cannot be produced by conventional methods. For some of these intricate geometries a CT scan may be the only viable method of quantifying that the part geometry conforms to the design intent. The technical advantages of CT scanning systems have already created a solid market for this technology, yet this technology is still emerging, and the potential for the future is huge.
If you intend to purchase a CT scanning machine, or take advantage of a CT scanning service vendor, the requirement for certified and traceable error statements for these systems cannot ignored. Accuracy statements for these systems need to be exact and meaningful, rather than obscure statements of resolution or fractions of a pixel, or other measures that replace quantifiable error statements with wishful thinking.
For more information, call (800) 327-9735, email [email protected] or visit www.zeiss.com/metrology.


