Calibration and Measurement Systems: The Unsung Hero in Quality Efforts
Timely calibration of all measurement devices is critical to manufacturing efforts.


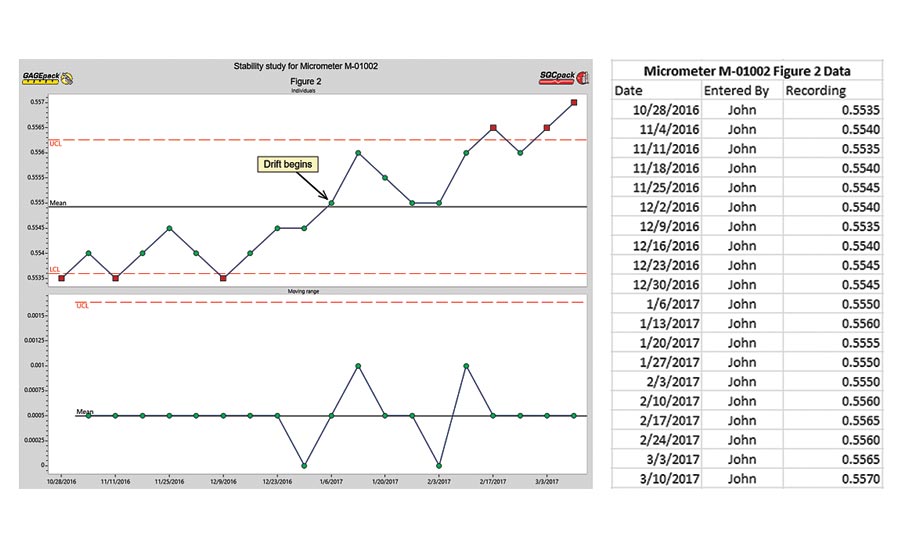
Reviewing the data can be helpful, but the real benefit is from seeing control charts that are generated by this data, where changes and drifts can be spotted more easily. In M-01001’s chart, while there is variation between measurements, the gage is fairly stable.

The chart for M-01002 shows a noticeable drift in the measurements near the beginning of January.


While process improvement initiatives, including SPC and its use of control charts, sometimes get the greatest attention in manufacturing environments, the backbone of a quality improvement effort is often the quiet, unnoticed measurement devices that represent an organization’s commitment to consistency and accuracy. These silent workers give vital information by providing meaningful measurements and assurance about whether products are ready to ship or not. They deserve to be treated as a top priority in any organization.
Gages and other measurement devices are found throughout manufacturing facilities. Some companies have thousands of these devices, and depend on them to give accurate information. This is why timely calibration of all measurement devices is critical to manufacturing efforts.
Like most things we use, gages are subject to wear and tear over time. If this process is not carefully monitored, devices will eventually fail to measure parts accurately, thereby giving unreliable information about processes and outcomes. Calibrating them demands a disciplined approach: regular intervals between calibrations, with comparison to known reference values, such as a set of gage blocks. Without this disciplined approach, the gage may indeed continue to measure within the allowable tolerances. However, if the gage is found to be out of tolerance for various calibration checks, the challenge lies in knowing the point at which this gage had begun to have accuracy issues, and determining how many parts need to be rechecked. A failed calibration can wreak havoc on a calibration manager’s day as corrective action plans are set in motion. It goes without saying that the failure demands an investment of resources that could have been avoided.
So how can one mitigate the risk of gages failing when it becomes time to calibrate?
Consider whether the calibration interval is appropriate for the given device. Many gage manufacturers offer general guidance on how often their tools can be calibrated. However, they steer away from prescribing precise intervals to use, since each work environment will vary. A gage at company A may enjoy a life in a temperature controlled room never far from its protective case while the same gage at company B could lead a ragged existence on a sweltering shop floor where regular abuse can be expected. So the use and environmental conditions should influence how often those two gages are calibrated, far more often for company B to reduce risk of using an inaccurate gage.
Reevaluate requirements that have been passed down from a customer or from regulations described in an industry standard. More often than not, calibration intervals were determined long ago at the company and the recommendation has been passed down over the years, unexamined and unchanged. The statement “We calibrate our micrometers every four months, and that’s the way it has always been done” is probably a familiar one to many.
Don’t let financial cuts or a shrinking quality department drive the decision to lengthen calibration intervals without regard for the increased risk that this causes for measurement systems accuracy. An arbitrary lengthening of these intervals without regard to their frequency of use, age of devices, etc., is foolhardy indeed.
Calibration intervals must be established only after patient analysis. Resources such as the gage manufacturer, articles in professional journals, and online forums may assist with a baseline interval to start with, but the continued effort lies in determining what the best calibration interval is given the device’s anticipated use, environment, and customer requirements.
Since calibrations demand expenditures of critical resources of time, effort, and money, arbitrarily decreasing the intervals is not the way to assure their accuracy. Ideally, the time to calibrate a gage is the moment just before it begins to lose its accuracy. Without the benefit of tarot cards or a crystal ball, it can be nearly impossible to predict that time frame accurately. Even if a gage is found to wear generally at a consistent rate, a special case such as a careless technician dropping the gage and not reporting it could easily cause a failure the next time it is set for a calibration.
While the exact moment for ideal calibration of a gage cannot be precisely determined, undertaking a stability study can not only help quality managers zero in on an appropriate calibration interval for a gage but also identify when an abrupt change that impacts the gage’s accuracy occurs. The setup for such a study begins after a gage has been calibrated. A user is selected to act as the appraiser for the duration of the study. A part is then chosen, preferably one that is stable and not subjected to drastic environmental changes. A schedule begins for the user to take a measurement reading on the part every few days and record this reading on a log. A simple control chart generated from this data can highlight drastic changes or gradual drifts to indicate wear in the gage.
To get the most of such a study, some considerations must be noted. Having the measurements taken by the same individual each time can reduce variation in the measurements that come from operators with different experience, training, and touch/feel for the gage. It is also wise to take the measurements near the same time of day, in order to avoid undue environmental changes such as a chilly morning or a balmy afternoon, if these are done on the shop floor. By measuring the same part one of the last possible elements of variation except for the gage itself is removed. And it is the gage that is, after all, the focus of the investigation. The last advice is to record the measurements as they are, not what you may hope that they are. This effort and patience pays off when it becomes possible to identify the moment when the gage has become unstable over time. Looking at examples may be useful.
John is a technician at his company and he has been tasked with performing stability studies on two similar gages to determine whether the calibration intervals are set appropriately. Gage M-01001 is assigned to the inspection lab, while M-01002 is used on the shop floor. Both micrometers were calibrated at the end of October in 2016. John began the studies on October 28, 2016, and continued to record new measurements each Friday.
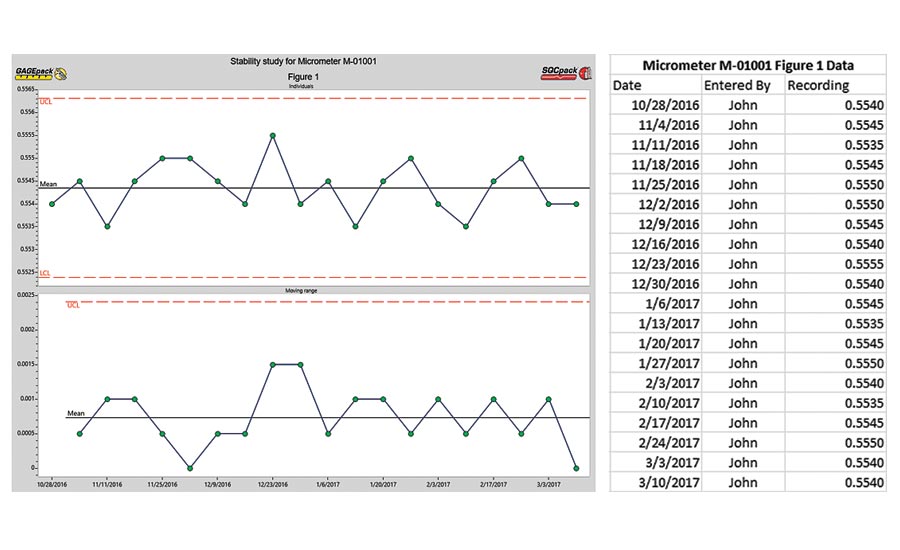
Figure 1 and Figure 2 show the recorded data for both studies. John took the measurements at same time of day each Friday and in the location where the gage resided to avoid environmental influences.
Reviewing the data can be helpful, but the real benefit is from seeing control charts that are generated by this data, where changes and drifts can be spotted more easily.
In M-01001’s chart, while there is variation between measurements, the gage is fairly stable. It currently has a six-month calibration interval, so as of now there is no evidence to suggest that the calibration should be completed before April 26, 2017.
In contrast, the chart for M-01002 shows a noticeable drift in the measurements near the beginning of January. Something has altered the gage’s ability to maintain stable and consistent measurements. An early calibration is warranted in order to bring the gage back into proper working order and accurate measurement.
Waiting until April 2017 to calibrate M-01002 may have resulted in numerous parts being rechecked to validate the measurements, thereby wasting time, resources, and energy for the quality department. Further stability studies on this gage could provide the evidence needed to reduce the calibration interval to three months so potential issues are caught before the gage begins to wear or drift out of tolerance.
John’s efforts have saved his company money and helped to show that gages on the shop floor wear at a faster rate than in the inspection lab. Future quality plans could include training of the technicians on the shop floor for proper handling and care of gages in their department.
Three possible outcomes of conducting a stability study:
The gage is consistent and stable during the time between its scheduled calibrations. Evidence to support the decision to lengthen the calibration interval is provided.
The gage begins to wear prior to its scheduled calibration. Shortening of the calibration interval can be justified to avoid risk of using the gage past the point where it is stable.
A special case is caught and corrected before it negatively impacts the measurement process. An unplanned calibration can be scheduled to address the issue and have the gage back to peak performance with minimal downtime or rework.
Regardless of which outcome ensues, the quality department or calibration technicians will begin to save time, money, and effort. Unnecessary calibration events can be postponed while focus can be directed to gages that need greater attention. While experience and intuition can be a great asset to any calibrator, evidence and data can significantly reduce the risk of relying on ill-chosen calibration intervals. Continued examination and analysis of gage calibration intervals benefits the whole organization and embodies the spirit of continuous improvement.
And once again, these unsung heroes will have saved the day and contributed to the quality of products.
Looking for a reprint of this article?
From high-res PDFs to custom plaques, order your copy today!


