Quality 101
How Accurate Surface Finish Measurement Improves Product Life and Performance
Here we’ll explore the intricate relationship between surface finish and factors like friction, wear, and fatigue life.

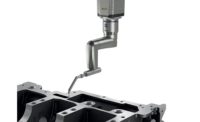
A high-accuracy surftest tests a semiconductor chip for surface roughness along with waviness and deviations from the ideal surface profile. All Images Source: Mitutoyo
Surface roughness, a phrase often used interchangeably with surface finish, plays a critical role in determining a product’s lifespan and performance. In fact, precisely measuring surface roughness contributes to the development of reliable products across such critical industries as aerospace, automotive and medical devices.
And while roughness is a critical parameter, it’s not the sole surface texture characteristic influencing product performance. For instance, the lay refers to the direction of the microscopic peaks and valleys on a surface. For components like bearings, a unidirectional lay is preferred to minimize friction. Another factor, waviness, describes larger-scale deviations from the ideal surface profile. Waviness can impact factors like sealing effectiveness and light reflection. These are all measurable surface texture elements.
This article explores the intricate relationship between surface finish and factors like friction, wear, and fatigue life. It delves into how precision surface finish measuring techniques enhance product reliability and analyzes the evolving landscape of measurement technologies.
Surface Finish Measurement Plays Many Important Roles in Manufacturing
Every manufactured component possesses a designated surface finish, meticulously chosen based on its purpose. Understanding the surface finish needed for a given product is crucial for designers and manufacturers. The importance of surface finish is reflected in the existence of international standards set by organizations like the American Society of Mechanical Engineers (ASME). These standards define different roughness grades for various applications, ensuring consistency and facilitating communication between designers, manufacturers, and quality inspectors. That’s where surface measurement comes in.
The chosen manufacturing and surface finishing process—from cutting, milling, grinding, and turning to polishing, buffing, lapping, honing, shot peening and chemical finishing—will inevitably leave surface marks, influencing a product’s roughness or smoothness.
Traditionally, manufacturers relied on a comparator method of surface finish measurement using a reference specimen with varying degrees of roughness. Operators would run their fingernails across both the reference and the manufactured part to assess the finish.
Today, sophisticated instruments ensure greater precision and accuracy in surface measurement. And the rise of faster, more sophisticated manufacturing processes has driven increased adoption of noncontact surface measurement techniques such as laser scanning and optical sensing. These methods offer the advantage of in-line or near-line measurement, facilitating faster process control.

Why Surface Measurement Is Critical to Product Performance
Accurate surface measurement offers several benefits. For instance, it predicts product lifespan and performance. By analyzing surface texture, manufacturers can accurately forecast how a component will behave in terms of wear, friction, and fatigue.
By helping manufacturers maintain consistent surface finish across production runs, precise surface measurement also helps guarantee product quality and reliability. And surface measurement data allows manufacturers to optimize their processes to achieve the desired surface characteristics.
Where Precise Surface Finishes Make the Biggest Difference
Rough surfaces generate more friction than smooth ones. This increased friction translates to higher energy consumption and potential wear. Precise surface finishing helps optimize friction coefficients for efficient operation.
Surface finish also significantly impacts how a component resists wear and tear. Smoother surfaces exhibit lower wear rates, while rougher finishes might be suitable for applications requiring good gripping properties.
Surface irregularities function as stress concentrators, increasing the likelihood of fatigue failure under repeated stress. Precise surface finishing techniques minimize these irregularities, thereby enhancing a product’s fatigue life. Precise surface finish specs are also critical to sealing performance. Gaskets and O-rings rely on a specific surface texture to create a tight seal and prevent leakage.
Surface finish plays a key role in electrical conductivity, as well. Contact resistance between electrical components depends on surface roughness. Smoother finishes ensure better conductivity and minimize energy losses.
Light reflection and aesthetics are also important considerations. Surface finish plays a crucial role in determining a product’s visual appeal. Highly polished surfaces create a shiny, reflective aesthetic, often desired for decorative applications. In contrast, a matte finish with a controlled roughness might be preferred for products where a non-glare appearance is crucial.
Self-cleaning properties are another important consideration in surface finishing. For instance, superhydrophobic surfaces, with a specific micro and nano-scale roughness, exhibit water-repelling properties, making them easier to clean and resistant to dirt accumulation.
In addition, the ability of paint or adhesives to adhere to a surface is influenced by texture. A slightly rough surface provides a better anchor for coatings compared to an overly smooth one.

Different Industries, Different Surface Finish Measurement Needs
Based on these core principles, precision surface measurement techniques address different critical needs across industries, including:
- Aerospace: A rougher surface finish on an aircraft wing can lead to increased drag, resulting in higher fuel consumption and reduced range. Smooth finishes on exterior aircraft components are thus crucial not only for minimizing drag but also for preventing corrosion.
- Automotive: Surface finish in automotive parts affects friction, wear, and lubrication retention. The surface finish of piston rings in an engine directly impacts oil consumption and wear, for instance. A honed finish creates microscopic pockets that retain oil, reducing friction, while a slightly rougher finish promotes better sealing but may require tighter tolerances to prevent excessive oil leakage. In the transmission, rough surfaces on the gear teeth increase friction, leading to power loss, excess heat generation and accelerated wear. Conversely, a smooth finish minimizes friction, maximizes efficiency, and extends gear life. Gaskets and seals also require specific surface textures for optimal performance. A component with a rough surface might not mate perfectly with the gasket, allowing for leakage, while a smooth finish ensures intimate contact between the surfaces, forming an effective seal.
- Medical Devices: In medical implants such as artificial joints, surface finish plays a vital role in osseointegration, the process where bone tissue bonds with the implant. A slightly rough surface finish promotes cell adhesion and facilitates implant integration, what’s called biocompatibility. However, excessive roughness might hinder cell growth and lead to implant rejection. On the other hand, needles require a smooth finish for minimal tissue disruption during insertion.
- Consumer Electronics: Touchscreens in smartphones and tablets require finishing techniques that deliver the smooth, scratch-resistant surface required to provide a seamless user experience. Additionally, a precisely controlled surface texture on electrical contacts ensures optimal conductivity and prevents electrical arcing.
- Food Processing Equipment: Hygiene and ease of cleaning are paramount in food processing equipment. Smooth, polished surfaces minimize the risk of bacterial growth and facilitate cleaning.
- Cutting Tools: The cutting performance of tools like drill bits and blades is heavily influenced by surface roughness. A rough finish can lead to higher cutting forces, increased vibration, and premature tool wear. A smooth finish translates to clean cuts, reduced tool wear and longer cutting life.
The Emerging Future of Surface Measurement
In the future manufacturers expect to see as surface measurement techniques and equipment grow increasingly sophisticated in a variety of ways:
Integration with manufacturing processes: The future of surface measurement lies in seamless integration into production lines. Ideally, manufacturers should be able to analyze surface finish instantaneously as parts are being produced. Such real-time feedback enables immediate adjustments to ensure parts meet required specifications, minimizing waste while enhancing production efficiency and quality control. Surface measurement integration into manufacturing will make significant inroads within the next decade, driven by advances in automation and Industry 4.0 principles.
Advancements in noncontact methods: While traditional contact-based methods remain dominant, noncontact measurement techniques like laser scanning and optical sensing are gaining traction for applications involving hard-to-reach areas or delicate components. As noncontact technologies improve their range and affordability, they will play a more prominent role in surface measurement across industries.
The challenge lies in the limited area coverage of noncontact surface measurement methods compared to their contact counterparts. This makes them less suitable for applications requiring analysis of large surface areas. The rise of additive manufacturing (3D printing) presents a new frontier for surface measurement. As 3D-printed metal parts become more commonplace, the need for noncontact measurement techniques to assess their unique surface textures will become increasingly important.
Tailored solutions for emerging technologies: Additive manufacturing and other innovative surface production methods will necessitate the development of specialized new measurement techniques. These production innovations include:
- Smart Surfaces: Surfaces with embedded sensors will monitor parameters such as wear, temperature, and stress. This real-time data can then be used for predictive maintenance and performance optimization.
- Self-Healing Surfaces: Materials that can autonomously repair minor surface defects are a potential next frontier in manufacturing. This technology could revolutionize product longevity and maintenance requirements.
- Biomimetic Surfaces: Taking inspiration from nature, researchers are developing surfaces with unique properties like self-cleaning or anti-fouling behavior. These surfaces could find applications in diverse fields from medical devices to marine engineering.
Surface roughness and overall surface texture play a critical role in maximizing product lifespan and performance. Through a collaborative approach that integrates precise surface measurement with efficient finishing techniques, manufacturers can enhance the functionality, quality, and reliability of their products. As technology advances, surface measurement is poised to become even more integrated into the manufacturing process, paving the way for increasingly precise control over surface characteristics.
Looking for a reprint of this article?
From high-res PDFs to custom plaques, order your copy today!


