NDT | Aerospace
Neutron Imaging Advances Aerospace Valve Inspection Capabilities
The complexity of modern aerospace valves creates a particular challenge for traditional inspection methods.

Gadolinium-tagged turbine blade shows highlighted ceramic core material in neutron image that is invisible to x-ray.
Image Source: Phoenix LLC
When traditional inspection methods failed to identify the source of critical helium valve failures in a $5 billion satellite launch system, daily operational costs mounted into millions. The breakthrough finally came from neutron imaging, a form of nondestructive testing, which revealed what conventional methods couldn’t detect: tiny fragments from cleaning materials blocking crucial valve components.
The Challenge of Modern Valve Inspection
Aerospace valves, particularly those handling cryogenic fluids or controlling critical systems, must perform flawlessly under extreme conditions. A single valve failure can lead to costly delays, mission failures, or catastrophic system breakdowns.
These components present unique challenges:
- Seals can degrade or become brittle under extreme temperature conditions
- Manufacturing processes can introduce contamination
- Complex assembly procedures may result in misaligned or improperly installed components
- Trapped cleaning fluids or worn sealing surfaces can compromise valve performance and system integrity
- Chemical exposure during operation can lead to material degradation over time
While valuable for many applications, traditional inspection methods like X-ray imaging face significant limitations when examining these potential issues. For example, X-rays struggle to detect common problems that involve lightweight materials within metal housings or subtle changes in sealing surfaces.
The complexity of modern aerospace valves creates a particular challenge for traditional inspection methods. X-ray imaging struggles with the combination of dense metal housings and lightweight internal components like polymer seals and O-rings. This limitation becomes especially critical when valves must be inspected nondestructively while maintaining their flight certification status. The industry needed a different approach - one that could peer through metal housings while revealing the condition of crucial internal components.
A Different Way of Seeing with Neutron Imaging Technology
Just as doctors use both X-rays and MRI scans to see different aspects of the same injury, aerospace inspectors need multiple ways to examine valve assemblies. What makes neutron imaging so valuable is how differently it interacts with materials compared to X-rays. While X-rays interact with electrons, neutrons interact with atomic nuclei, creating remarkably different views of the same component.
This difference produces some surprising but valuable results. Some metals that typically block X-rays, such as aluminum, appear almost transparent to neutrons. Meanwhile, materials containing hydrogen - such as plastics, water, and organic matter - show up in sharp contrast. Even heavy metals like lead, which stop X-rays completely, allow neutrons to pass through with minimal interference.
These unique properties transform how inspectors can examine valves. They can now see through metal housings to check polymer seals, detect trapped moisture or cleaning fluids, spot organic contamination, and verify the proper installation of composite components. Components that were previously difficult or impossible to inspect can now be examined thoroughly while fully assembled.
Advanced Imaging Capabilities with Digital Technology
Modern neutron imaging has evolved well beyond basic 2D radiography. Today’s systems can create detailed three-dimensional models using computed tomography (CT), giving manufacturers unprecedented views inside their components. Inspectors can examine cross-sections from any angle, measure internal dimensions without disassembly, and detect subtle variations in density that might indicate defects. This detailed 3D visualization helps ensure critical requirements for clearances and tolerances are met.
One of the most significant advantages of neutron imaging is its ability to detect foreign objects and debris (FOD) - a persistent challenge in aerospace manufacturing. While X-rays might miss materials like wood fibers, tape residue, cleaning swab fragments, or trapped moisture, these contaminants show up clearly in neutron images. This capability proved crucial in the satellite launch system case mentioned earlier. After neutron imaging revealed cleaning material debris lodged in the critical helium valves, inspectors could examine all available replacement valves to identify the best candidates for installation.
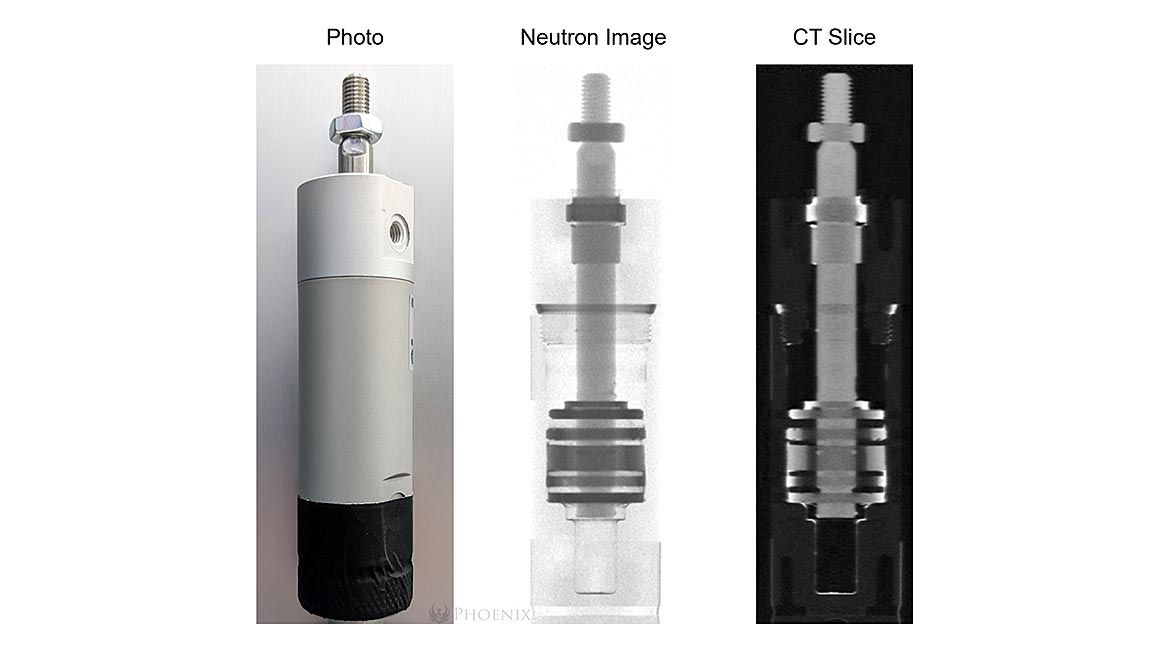
The technology is equally valuable for examining seals and interfaces, as demonstrated in the following pneumatic actuator inspection.

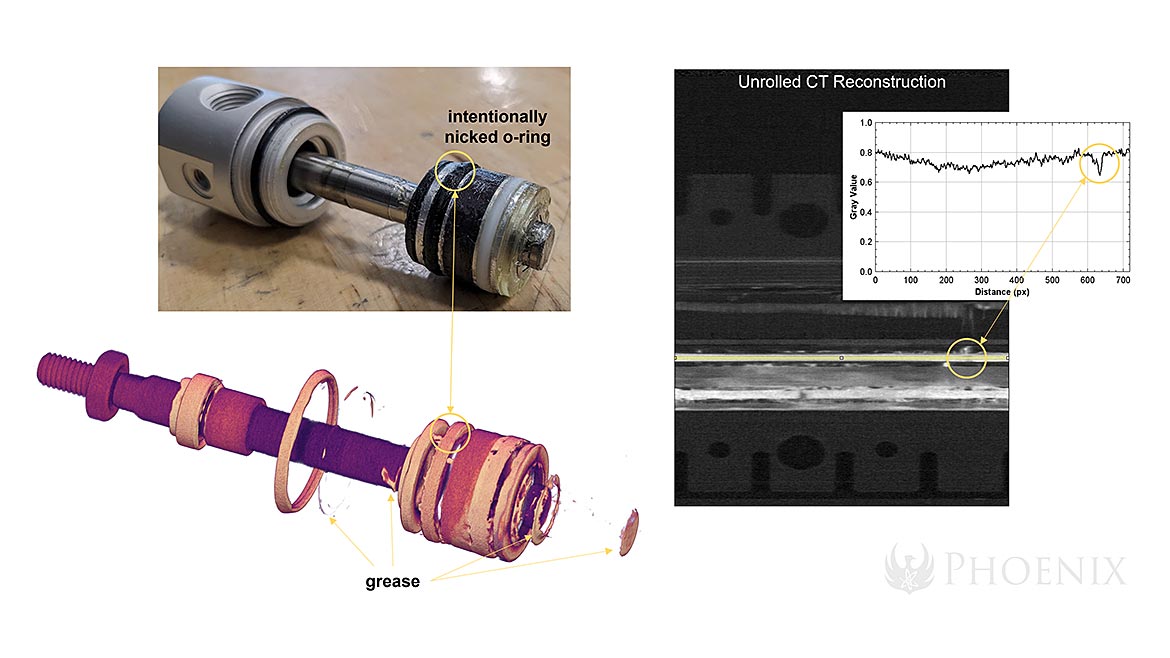
Engineers created a detailed 3D model by capturing hundreds of neutron images as the component rotated through a complete 360-degree cycle. The resulting visualization revealed not only the position of every O-ring through the aluminum body, but also the distribution of lubricating grease on internal surfaces. Most importantly, it uncovered a damaged O-ring that other inspection methods had missed. Using advanced analysis tools, inspectors could precisely map the defect’s location and severity by virtually ‘unwrapping’ the circular seal to examine its entire circumference.

Digital Imaging Advantages
Digital neutron imaging has transformed how inspectors work with their findings. Instead of waiting for film development, they can now review images instantly and adjust settings in real time to capture optimal views of critical components. This immediate feedback not only speeds up inspection but also helps ensure nothing is missed.
The power of digital systems extends far beyond basic image capture. Modern analysis software can create detailed three-dimensional models from the scan data, automatically highlight potential defects, and compare measurements against design specifications. These tools help inspectors work more efficiently and consistently when examining complex components.
Digital systems have also revolutionized how inspection data is managed and shared. Images are automatically archived in secure, searchable formats that authorized team members can access instantly. This digital trail maintains comprehensive documentation throughout a component’s lifecycle - crucial for aerospace applications where traceability requirements are stringent. The ability to share findings immediately with engineering teams at different locations has proven especially valuable when quick decisions are needed about flight-critical components.
Implementation and Integration
Quality professionals considering neutron imaging will find the technology integrates readily with existing inspection protocols. The process typically starts with understanding specific inspection needs:
- What defects or conditions need to be detected?
- What are the component’s material composition and geometry?
- What documentation and certification requirements apply?
- What throughput levels are needed?
The technology adapts well to existing quality assurance workflows, whether for prototype evaluation, production inspection, or failure analysis.
Looking Ahead
The field of neutron imaging continues to evolve. While traditional film-based radiography operates under established standards (ASTM E545 and E748), digital methods are opening new possibilities. Industry groups are actively developing standards for digital imaging and CT applications, focusing particularly on mission-critical aerospace components.
This standardization work is essential because digital neutron imaging and CT scanning represent the next significant evolution in valve inspection capabilities. As these standards develop, they’ll help ensure consistent, reliable results across the industry - particularly important for aerospace applications where documentation and traceability requirements are stringent.
Neutron imaging has already transformed valve inspection by revealing what other methods cannot detect - from trapped cleaning materials to damaged seals hidden within metal housings. Its unique ability to see through dense metals while highlighting lightweight materials makes it particularly valuable for complex aerospace components where traditional inspection methods fall short.
Perhaps most importantly, the growing adoption of neutron imaging is helping manufacturers detect potential issues earlier in their processes. This early detection not only prevents costly failures but also provides valuable feedback for improving manufacturing methods. As aerospace systems become more complex and performance requirements more stringent, this capability will become increasingly crucial for ensuring component reliability and system safety.
Looking for a reprint of this article?
From high-res PDFs to custom plaques, order your copy today!


