High Slope Metrology with Non-Contact Interferometry
Coherence Scanning Interferometry technology has a number of advantages over traditional contact surface measurement techniques.


Optical profilers using Coherence Scanning Interferometry (CSI) are used in manufacturing to obtain information about both a part’s surface and its gross form. Surface quantities measured include flatness, roughness and waviness. Form measurements often include feature heights, widths, angles and roundness.
How does CSI work?
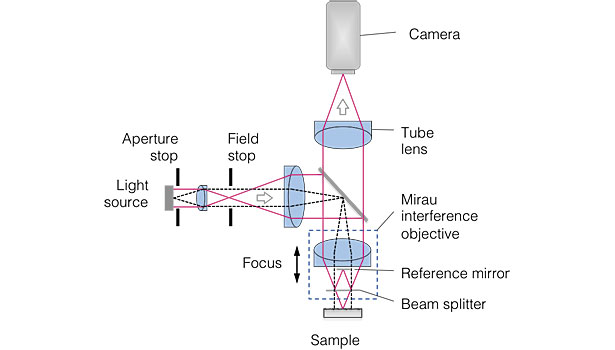
CSI tools can accurately quantify surface and form with nanometer-scale repeatability using an interferometric objective scanned relative to the part being measured. White light entering the objective is split into two beams: a reference beam travels to a flat reference optic within the objective, and a test beam exits the objective towards the part being measured. Reflections from the reference optic and the part recombine within the objective and are imaged by a camera. Scanning the relative path-lengths of the test and reference beams forms interferometric signals, which by design are strongest when the corresponding part is located at the best focus position. Mapping the peak-signal location for each pixel yields a topographic map of the part.
TECH TIPSCSI technology has a number of advantages over traditional contact (stylus-type) surface measurement techniques. The most obvious is that CSI is inherently non-contact so the test method will not damage or alter the surface of a precision-machined part. Relative to stylus measurements, CSI acquisition is fast, enabling increased throughput and part-sampling frequency. |
Advantages of CSI Technology
CSI technology has a number of advantages over traditional contact (stylus-type) surface measurement techniques. The most obvious is that CSI is inherently non-contact so the test method will not damage or alter the surface of a precision-machined part. Relative to stylus measurements, CSI acquisition is fast (typically about 0.1 seconds per micron of scan-range), enabling increased throughput and part-sampling frequency. Finally, CSI metrology is inherently areal—not just a single-profile line—producing information-rich 3-D data sets that can reveal process issues relating to both surface characteristics and form. This can be critical for functional surfaces such as sealing interfaces, molds and flow channels.
High Slope Applications for CSI Microscopes
Measuring highly sloped surfaces has traditionally posed challenges for CSI optical profilers. Slopes within the acceptance angle of the objective are generally easily measured, but beyond this fundamental limit only a small fraction of incident light scatters back in to the camera. Use of an objective with higher acceptance angle (indicated by the numerical aperture or NA) might seem to be an obvious solution but doing so is usually at the cost of a smaller field of view (FOV) and reduced working distance (WD). This in turn limits the diameter of the parts that can be measured in a single FOV, and reduced WD may be unacceptable for deeply recessed features.
Recent advances in instrument design and software have dramatically improved CSI sensitivity, enabling measurement of previously inaccessible high slopes as well as recessed features. The result is that many parts can now be measured with larger-FOV objectives, enabling improved throughput or statistical sampling.
Challenging high-sloped surfaces occur in virtually all industries. Specific manufacturing examples include fuel injector roundness, component geometry and medical syringes.
Roundness Inspection
Circumferential roundness on the conical sealing surface (“seat”) of a fuel injector is a critical inspection parameter: out-of-specification roundness increases the likelihood of leakage paths for pressurized fuel, which can cause an entire injector assembly to fail.
For the best metrology, the measurement should capture the entire sealing surface in a single FOV while also capturing data on the high-slope surfaces. In the past, this has posed challenges for steep large-diameter cones: as the acquisition of data on the high-slope surfaces required higher-magnification objectives with insufficient FOV to capture the entire sealing surface.
The newest generation of optical profilers can repeatably quantify roundness for a wider variety of fuel injectors, capturing larger-diameter cone seats in a single FOV while retaining good data coverage on the high-slope sealing surfaces. A typical example is the ability to measure a 50% wider diameter injector seat for a given cone angle using an objective with half the magnification that was previously required.
Radius (Fuel Injector)
External geometries of components are typically designed to match or fit with a mating port. Geometric requirements for parts are therefore critical to ensure fit, function and interchangeability. Challenges to measuring part geometries can include steep slopes (25? to 60?), large extent (up to 10 mm in diameter), and micron-scale features (<0.5 mm Ra). Modern CSI profilers are capable of acquiring data with these difficult part geometries.
Part geometry is especially critical for replacement fuel injectors. The original and replacement parts may have been manufactured at different facilities, yet part functionality requires that the replacement part fit exactly in the space previously occupied by its predecessor. CSI enables new form-measurement capabilities ensuring this designed interchangeability.
The outer diameter of an injector mounts and seals against an engine block or assembly via ‘shoulders’, characterized by a precise circumferential radius formed at the intersection of two steep-slope regions. Measuring the shoulder region previously required stitching many multiple high-magnification measurements. CSI optical profilers enabled with new high-sensitivity capabilities can now characterize circumferential radius at lower magnification, significantly decreasing measurement time.
Angle (Cutting Tool & Razor Blade)
Manufacturing employs tools to quickly remove material to form and eventually finish the final surface of a part. Cutting tools of all shapes and sizes are designed with features comprising micro-geometries contoured along the length of the tool.
Manufacturers will regularly hone cutting tool edges to prevent premature fracturing while also improving the surface finish of the part being cut. Inherent in the design of cutting tools are acute angles and high slopes, whose measurement challenges have sometimes limited inspection to subjective visual classification of the cutting edge and radius. CSI-based optical profilers can now provide data on the edge quality of cutting tools making each step of the honing process quantifiable and repeatable.
Benefits for the tool owner include:
- Increased tool lifetime
- Reduced or eliminated rework for final finish
- Reduced machining time
- Reduced cutting friction
Small Size Steep Angle (Hypodermic Needle)
Hypodermic needles are used frequently to extract or deliver fluids to the body. Needle tips are fine ground with multiple bevels with steep angles: patient comfort depends on the needle tip being sufficiently sharp and correctly formed. Visual inspection is commonly used for defect detection and categorizing needle tips. CSI optical profilers can provide a quantitative measurement of bevel angle.
More Acquisition Methods
Even with the latest advances in CSI signal processing, measuring particularly challenging parts can require even more sensitivity. Additional acquisition tools provide enhanced measurement capability with a user-specified balance in measurement time.
Signal Oversampling
Oversampling increases measurement sensitivity with a trade-off of increased measurement time, improving data coverage in high-slope regions.
High Dynamic Range (HDR)
Manufactured parts often exhibit a wide range of local reflectance due to variations in material, slope and surface finish. For such parts, HDR efficiently boosts sensitivity by combining measurements obtained at a variety of light levels.
Looking for a reprint of this article?
From high-res PDFs to custom plaques, order your copy today!


