5 Common Errors in Tensile Testing
As with any testing, the data is only as good as the test methodology allows.

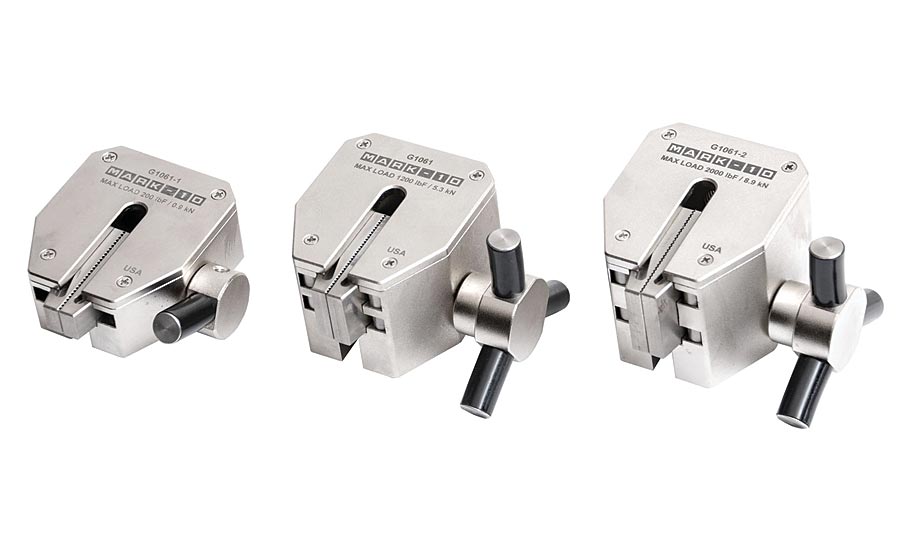
A selection of wedge-action grips. The self-tightening action of the jaws make them a common sight on tensile testers. Source: Mark-10

A force vs. travel curve. Common points of interest include peak force, break force, percent elongation, and others. Source: Mark-10

A 6.7 kN tensile tester is shown configured for an elastomeric tensile test. The sample is secured between two wedge-action grips. Force and travel distance are recorded and output to a PC for further analysis. Source: Mark-10

This small, benchtop tensile tester is rated to 1.5 kN, and may be used for tension and compression applications. The unit is shown with a force gage, which integrates a load cell and indicator into a single housing. Source: Mark-10

A typical strain gage-based load cell often used with tensile testers. Load cells are available in capacities from as low as a few grams to hundreds of thousands of pounds. Source: Mark-10


Younger readers may be surprised to hear that the word plastic was once synonymous with cheap. Maybe that’s why Dustin Hoffman’s character was famously given the career advice to get into plastics in the movie “The Graduate.” It was, as they say in some quality circles, a target rich environment. Today, however, the quality of plastics and other materials are advancing at a rapid pace. Materials are becoming stronger, harder, lighter, and in many cases less expensive. The method of manufacture is also rapidly changing. Three-dimensional (3D) printing has become a viable option in many applications, and not just for plastics. The cost of 3D printing of metals, while still prohibitive in many cases, has been falling steadily. As materials and manufacturing methods advance, characterization and quality are as important as ever. Manufacturers have many reasons to pursue designs which are smaller, lighter, less expensive, and with less environmental impact. At the same time, customers’ expectations relentlessly increase.
One of the main tools in the quality toolbox is tensile testing. In tensile testing, a sample is subjected to a pull force. The test objectives vary from application to application, and can include measuring the breaking force, the force at a pre-defined elongation, elongation at break, as well as some scientific calculations, such as Young’s modulus. Test results can inform the designer or quality control engineer whether the material or sample has been designed and manufactured appropriately. But, as with any testing, the data is only as good as the test methodology allows.
Poorly conducted tests are detrimental to a quality program. Here are five common errors in tensile testing, and ways to correct them:
1. Wrong load cell capacity
The accuracy of load cells used with tensile testing machines is normally rated in one of two ways: 1. Percentage of full scale, or 2. Percentage of reading.
In percentage of full scale, a percentage equates to a fixed error that may be present anywhere from zero load to the full range of the load cell. In percentage of reading, the measured value is multiplied by the accuracy specification. A lower bound is sometimes specified in this method. For example, a load cell may be rated to a particular percentage of reading only from 10% of range up to 100%.
In both methods, using a load cell at the lower end of its capacity can produce a large error relative to the magnitude of the force being measured. Using a significantly oversized load cell can render the tensile measurement worthless, because uncertainty in the reading may be as high as the reading itself. Using the example of a 1,000 lbF capacity load cell and an accuracy of ±0.50% of full scale, an error of up to ±5 lbF can be expected. If this load cell is used to measure only 5 lbF, a 5 lbF error represents 100%, which is clearly unacceptable.
Corrective action
Manufacturers want to get the most utility out of a piece of equipment, thereby minimizing capital expenditures. However, before attempting to use a load cell it would be wise to determine the tolerance specification and compare that to the expected forces. Then, decide on an acceptable tolerance range, and determine whether it will be possible to measure forces within the defined criteria.
2. Using the wrong grip
In sports, the grip is the point where the athlete and the sport interface. Many a golf pro has solved a problem by adjusting their student’s grip. Similarly, recall the Deflategate football under-inflation scandal, which ostensibly originated with a desire for the team to make more completions via better grip with the football.
Tensile testing is no different. The grip is where the sample and the test equipment interface. Selecting the right grip can be as important as selecting the right tensile tester and load cell range. When measuring elongation, for example, if the grip is not able to secure the product properly, slippage will produce an erroneously high travel measurement. This measurement would be of little worth, and potentially damaging if it’s relied upon to make product design decisions.
Another angle to consider is the ability of a grip to allow for visual inspection before, during, and after testing. If the sample is obscured, it may be difficult to ensure that it is loaded properly.
Corrective action
Numerous standard grips are available to accommodate a wide range of applications. Reviewing the application with a tensile testing specialist, and submitting samples for testing by a lab or the tensile tester manufacturer can help determine the best gripping solution. When no standard solution is available, custom grips may be required.
3. Ignoring grip weight when measuring low forces
In many higher force applications, the weight of the grip is irrelevant, as it’s a small fraction of the capacity of the load cell. However, at lower forces, this can become a concern. For example, a wedge-type grip weighing 1 lb. will reduce a 2 lbF capacity load cell’s usable range by half. Even though most tensile testing systems allow the force reading to be tared (zeroed), a reading of “0 lbF” really means “1 lbF” after accounting for the weight of the grip. Failure to recognize this can result in an overload condition, potentially damaging the load cell.
Corrective action
To mitigate the cumulative effect of a grip’s weight on the force measurement, factor in the weight of the grip. If the grip weight is close to the capacity of the load cell, a lighter weight grip or higher capacity load cell should be considered. In considering a higher capacity load cell, however, recall the tradeoff between increased capacity and accuracy.
4. Axial misalignment
Common, uniaxial tensile testers are designed to pull a sample along a single, straight axis. If the grips and samples are loaded properly, the sample is pulled axially, and the test should yield meaningful results, ceteris paribus. If the sample is misaligned, these moments and offsets can skew the measurement, distort the sample, exert force on only a portion of the sample, and if significant enough, even damage the test equipment.
Corrective action
Use a grip appropriate for the test. Where possible, select a grip with jaw width as closely matched to the sample width as possible, to aid in sample placement. Tensile testers often contain base plates with adjustability in the x- and y-directions. If not, an x-y table can assist in aligning the lower grip with the upper grip. Swiveling adapters can also help the upper grip self-align under load.
5. Uncompensated system deflection
Travel measurements, required in stress-strain curves, elongation, and most other tensile tests, are subject to errors due to system deflection. These offsets originate from both the load cell and the test frame. Strain gage-based load cells, by their nature, deflect slightly as a load is applied. A typical range is approximately 0.010” (0.25 mm) at full scale. The test frame itself will also deflect under load. Deflection may or may not be linear, depending on the geometry of the load cell and the test frame.
To put things into perspective, if a sample deflects by 0.100” and an uncompensated offset of 0.030” is present, the resulting travel measurement will have an error of 30%, with potentially larger effects on the force measurement. With more elastic materials, an offset of 0.030” would be less of a concern.
Corrective action
Some tensile testers have built-in compensation routines, automatically correcting travel measurements. For testers without automatic compensation, the results should be manually adjusted.
No correction is perfect, however, which means that with very low-deflection materials, such as ceramic, a better solution is needed. Extensometers are helpful in the measurement of very small movements. An extensometer measures stretch in the sample itself, with contact and noncontact options available. Because it is isolated from the frame and load cell, these measurements are free from the effects of system deflection.
Tensile testers are designed to test a near infinite amount of materials in a wide range of shapes, sizes and applications. While selection and configuration can seem daunting, keeping these common errors and corrective actions in mind will help narrow down the available choices to an ideal solution, while ensuring that test results are as accurate and consistent as possible.
Looking for a reprint of this article?
From high-res PDFs to custom plaques, order your copy today!


