Case Study
Hardness Testing Assures Quality in Advanced Materials
Hardness testing is often the best way of establishing that components will survive and perform in their intended applications.


Many new products entering the market today are based on new materials and processes. These new materials are playing increasingly important roles—supporting innovation and boosting competitiveness in technology driven industries.
The manufacturing processes and quality requirements for products made using high-tech materials call for a comprehensive knowledge of process technology in addition to thorough knowledge of the material’s properties. Among the various mechanical and optical tests used to determine the characteristics of a material and its suitability for a given application, hardness testing is one of the most critical. Hardness is defined as the mean pressure a material will support. Hardness testing is typically undertaken to assess resistance to plastic deformation, a value of tremendous importance to the determination of part quality in a wide range of industries and applications.
Exposure to loads, pressures and extreme temperatures in manufacturing has the potential to affect the performance of parts comprised of metals and metal alloys. Due to complex specimen geometry and linear correlation between hardness and tensile strength in metals, hardness testing is often the best way of establishing that components will survive and perform in their intended applications. As a result, hardness testing has become an essential part of the quality control process.
Accurately determining the hardness of a material for any given application involves several factors including the type of material, specimen geometry, surface conditions, exposure to heat treatment processes, and production requirements.A range of different hardness tests may be applied to determine different hardness values for the same test specimen. Selection of the type of hardness test is often influenced by end-customer requirements, as hardness measurements are commonly reported values on spec sheets accompanying the delivery of manufactured goods.
Among the most common tests used to determine material hardness are the Rockwell hardness test, the Brinell hardness test, and the Vickers hardness test. These three tests measure hardness by determining resistance to the penetration of a non-deformable ball, cone, or four-sided pyramidal indenter. While the Rockwell and Brinell tests apply primarily to bulk metals and ceramics, there is an ISO standard for Rockwell hardness testing of plastics: ISO 2039-2. The Vickers test may be utilized to measure hardness of metals, some ceramics, polymers and even some biomaterials. Each test determines the depth to which the indenter will sink into the material, at a defined load, within a specific period of time.
The Rockwell hardness test is a measurement based on the net increase in depth of impression as a load is applied. In the Rockwell method of hardness testing, the depth of penetration of an indenter following application of a minor load and a major load is measured. The indenter may either be a tungsten carbide ball of some specified diameter or a spherical diamond-tipped cone of 120° angle and 0.2 mm tip radius, called a Brale indenter. The type of indenter and the test load determine the hardness scale which is expressed in letters such as A, B, C, and so forth.
Brinell hardness is determined by applying a tungsten carbide sphere of a specified diameter at a specified load into the surface of a material and measuring the diameter of the residual indentation post-test. The Brinell hardness number, or simply the Brinell number, is obtained by dividing the load used, in kilograms, by the actual surface area of the indentation, in square millimeters.
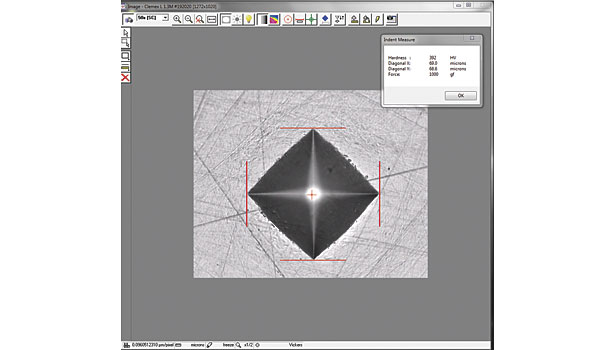
In the Vickers test the surface is subjected to a pre-defined load exerted by a four-sided pyramidal diamond indenter for a standardized length of time referred to as the dwell time. The diagonal of the resulting indentation is measured under a microscope and the Vickers Hardness value read from a conversion table. Vickers test systems have found acceptance in the most demanding quality control applications including the inspection of welds on submarine hulls and heavy duty machinery utilized in manufacturing operations.
Jungheinrich AG of Hamburg, Germany, is among the world’s leading companies in the field of materials handling and warehousing equipment. The company is currently working on a new platform concept for the construction of different types of vehicles. Among the variety of test methods used by Jungheinrich for quality assurance is the test on welded joints to EN ISO 9015. To prevent cracks due to age-hardening, the welded joint is heat-treated and the heat-affected zone is then subjected to Vickers hardness tests. Vickers hardness is tested in the parent metal and in the heat-affected zones, as well as along the weld line and within the weld metal. The indentation position must be listed with the results in the test report.
The indentation positions can be ‘taught’ in the video image via a mouse click and their position automatically stored in the test system software. Different lens magnifications can be used for the teaching and the measuring, ensuring maximum image area and maximum measurement resolution. Multiple hardness traverse tests are performed automatically, with all indentations automatically made, focused and measured. The test report with the required results and data is automatically generated in the test system software so that the results are available quickly and cost-efficiently.
“We use the instrument mainly to provide effective testing of weld seams from our own production line and also for goods inwards checks on the nitrided hardness and surface layer hardness of components from our suppliers,” says Benjamin Elst of Jungheinrich’s quality assurance department.
The ability to automate the testing process and reduce the amount of time invested by laboratory technicians in the testing process is important to cost-effective quality control.
National Oilwell Varco (NOV) specializes in the provision of oilfield tubular inspection, internal tubular coatings and other services. The NOV facility in Kalundborg, Denmark, manufactures flexible pipes for the off shore oil industry. The facility produces some of the strongest and most advanced flexible pipe systems in the world and has innovation and quality at the center of its mission.
The manufacture of flexible piping requires a great deal of welding. Managing the quality of this welding is essential to ensure optimum sub-sea performance in one of the most demanding offshore engineering environments. One of the indicators of weld quality is the hardness of the welded area, the heat affected zone and the parent metal. The flexible material has extremely strict acceptance criteria, and it is essential that no changes to the material have occurred during the manufacturing process. NOV production supplies specimens of the welds to the company’s internal quality department. The specimens are then cast in epoxy, ground and etched prior to testing. When the NOV quality assurance laboratory determined that constraints were arising due to rising production levels and subsequent increases in internal customer demand for measurements, the search began looking for an additional fully automated hardness tester. After reviewing several hardness testers, the company decided to purchase a ZHV10-A which is able to test between 100g and 10kg and uses Indentec’s ZHµ.HD software in an automated test system.
“The most important aspect was the program’s ability to make simple automated measurements. The system is intuitive and simple to use, giving reliable and repeatable results which is very important for us,” says Rene Munk Madsen, the NOV laboratory engineer.
One of the most common uses for hardness tests is to assess the effects of heat treatment on a part.
Keighley Laboratories uses a Zwick Roell ZHV-10 fully automated Vickers indentation measurement and dedicated hardness testing software at the company’s internal heat treatment division and clients of its technical services department.
Keighley Labs employs physical testing as quality assurance for its in-house heat treatment division, handling up to a dozen test samples daily, as well as undertaking case depth and surface hardness evaluation of materials and components for external clients. Keighley technicians can either view and measure indentations manually—by focusing with the joystick and clicking on indentations with the mouse—or engage the system’s automation mode to intelligently follow predefined patterns, indent the sample, then measure and generate test results. The system also enables technicians to set up templates of indentation points, for performing hardness tests on routine samples, and to program straight line and traverse patterns for automating case hardness routines and testing welded seams.
In addition to freeing up technicians for other tasks, this ‘click and walk away’ functionality ensures precise sample positioning and imaging, enhanced accuracy, an extremely high level of repeatability and overall increased productivity, reducing standard testing procedures from more than an hour manually to less than 20 minutes automatically. It also eliminates operator-related errors caused by eye strain, fatigue and inevitable inconsistencies, which can be a common problem in micro hardness testing.
“The time savings made possible by this automated hardness tester will enable us to offer faster turnaround times and deliver even more accurate, repeatable and reproducible data,” says Matthew Mellor, test house manager at Keighley Labs.
Hardness testing is also important in the development of new biomaterials.
The University of Tromso, Norway Department of Clinical Dentistry, is leading research into biomaterials for dental purposes (e.g. dental prosthetics). New polymer technologies for both clinical and cosmetic applications are developing at a rapid pace and hardness is one of the essential characteristics of materials used in such areas.
Among the challenges with an application such as this is the behavior of polymers in response to mechanical stimuli. Polymers tend to deform in such a way that obtaining an accurate measurement of hardness can be difficult. The corners of the indent resulting from a Vickers hardness test, for example, can be difficult to define manually. Utilizing advanced optics in combination with software functionality that measures indents to the last pixel, Vickers hardness may be accurately determined on samples that once posed substantial obstacles.
Recognizing the advantages new developments in image processing could offer in support of their application, officials in the university’s Department of Clinical Dentistry sought an automated micro Vickers hardness tester. The university ultimately determined that a fully automated system would offer two significant benefits: it would free a technician’s time to perform other tests and it would remove operator influence from the results thereby increasing repeatability and reproducibility. In particular, it was important that indentation loads could be applied with a high degree of accuracy.
“The hardness testing equipment will enable the Department of Clinical Dentistry to offer a significant increase in the throughput of test specimens and, in particular, provide the scientific community with a greater understanding of modern biomaterials used in dentistry and medicine,” stated Professor (Biomaterials) Ulf Örtengren.
Another area in which the latest generation of Vickers test equipment delivers value to quality management processes may be found in studies of large areas. As hardness values can vary widely from one end of a weld joint to another, the Indentec systems incorporate an image stitching function that allows the operator to precisely position indents and measure the resulting values over very large areas. Using the Mosaic function developed by Indentec, operators are able to rapidly obtain a high resolution and evenly illuminated view of the entire sample. The resulting images may also be saved for analytical reporting or for archiving purposes.
The Mosaic function also enables reference points for traverses to be set with a high degree of precision such that indentation measurements yield the most significant data. Annotation tools within the Mosaic function provide a strong visual connection to the sample—providing the operator with the capability to easily identify the center of the sample, draw straight and/or parallel lines, add ticker marks, and add measurements for reporting purposes. Operators may also use annotation tools to design complex patterns of traverses, where the resulting measurements lead to enhanced insights into material behavior.
Looking for a reprint of this article?
From high-res PDFs to custom plaques, order your copy today!


